Most crime happens at night which makes it important to have a security system that provides decent night vision images. It’s possible to improve the night performance of security cameras by following the tips and suggestions listed in this guide.
When you install a security system, it’s easy to make simple mistakes that may deteriorate the nighttime image quality of your CCTV system.
In this guide, we will talk about seven easy ways how you can improve the nighttime clarity of your security camera system. The tips are easy to follow and extremely low cost.

7 Easy Ways to Improve Security Camera Night Vision
1. Add more light
This seems obvious but it’s worth mentioning, adding more light to your area can drastically improve the nighttime quality of your security camera system
. As a matter of fact, if the area under surveillance is well lit, the camera can record in color mode and won’t turn on the built-in infrared LED lights.
If it’s possible to add more light, then you should do it. Let’s say there’s a driveway or the parking area where you leave your car, you can install a small porch light on the side of the building, or you can exchange your current light bulb with a brighter one.
Additionally, you can add floodlights, and path lights around your driveway, you can even use poles to mount the light at a higher spot.
Basically, any extra light sources will help the security camera to provide a clear and sharp nighttime image. If there’s enough light, you may even get color nighttime images that provide more details and clarity.
2. Install external infrared LED lights
As you may already know, most security cameras come with built-in infrared LEDs that automatically turn on when it gets dark and help the camera see the surrounding area. This light is not visible to the naked eye, only the camera can see it. The final image on your monitor (live/recorded) is always black and white.
Unfortunately, quite often these infrared blocks around the camera’s eye are not strong enough, or even inferior and the camera is not able to record decent nighttime images. Sometimes even the distance that the camera can see is short.
If you think that your camera’s infrared light is not good enough, you can add more external infrared light. These devices are called illuminators and are an ideal solution to brighten the area and help your camera see clearer.
You won’t be able to see the lights coming from the illuminator, only the camera can see it which means you’ll not pollute your area with unnecessary visible lights. Keep in mind to install the illuminator at the same line or farther than the camera, otherwise, the light may be reflected in the camera.

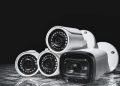
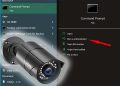
Depending on the models that you want to go with, the illuminators’ (as shown in the picture) prices can range from cheap to relatively expensive. From our experience, even an inexpensive illuminator block will do a good job helping the camera to see at night.
The most expensive ones are usually larger in size and come with more IR LED lights on the panel. They can illuminate a wider area and are recommended for huge areas such as parking, warehouse, or big commercial buildings. A few options of CCTV illuminators can be found here.
3. Avoid light sources hitting the camera directly
When you install a security camera, pay attention to the light fixtures or sources around the camera. You should not install a camera close to a bright light source, and never allow the light fixture rays to hit the camera’s eye directly.
There’s a reason for that, a strong light source close to the camera may blind the sensor which will make the picture white-washed or simply too bright.
It doesn’t matter if the light is coming directly from a light bulb or first reflected off a solid surface, the effect is the same. Let’s say there’s a solid wall, the light from the bulb may hit the wall and reflect the camera (blinding it).
If you can’t avoid the light course, then you should try to keep the light behind or on the side of the camera. So, the light bulb should be farther back compared to the camera itself.
4. Avoid reflected IR lights
This tip is similar to the previous one, same as the external (regular) light sources the camera may suffer from the reflected IR lights. If you allow unwanted infrared light to hit your camera, the nighttime picture will suffer heavily.
The interesting part is that the installer doesn’t even realize what’s causing the nighttime picture to deteriorate. Let’s say you have the camera mounted somewhere in your facility and you have angled it just right.
The daytime picture may look sharp and clear, however, the nighttime image looks horrible and you can’t even detect the subjects.
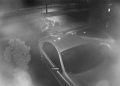
One of the main reasons why the nighttime picture lacks clarity is the IR lights being reflected from a nearby solid surface such as the soffit around the camera or the wall itself. The surface reflecting the infrared light back to the camera doesn’t even have to be in the view of the camera’s sensor.
The reflected IR light that blinds the camera may bounce back from a solid wall, a fence, soffit, other solid objects close to the camera.
Basically, any direct or reflected IR light, in clear view or nearby, will add artifacts on a nighttime image or make it too bright. It can be so bad, that the footage can be unusable.
To avoid this particular issue, inspect the spot where you plan to install the camera. Once installed, aim or angle it correctly avoiding any possible nearby solid surfaces. Monitor your nighttime images for a few nights and adjust them accordingly until you’re happy with the image.
5. Ensure that your camera is switching to night mode
Each camera has a so-called “IR cut filter” which filters the infrared light during the daytime. This filter is necessary to help the camera produce realistic color images, but at night it needs to be removed for the camera to see its own infrared LED lights.
When the camera switches to night mode, the image switches from color to black and white and the IR cut filter is automatically moved from the lens (via an internal mechanism). When this happens, you should be able to hear a short-click sound.
However, in some cases, the camera doesn’t auto-switch which means it needs to use the ambient light to see in the dark. If that’s enough, it won’t be able to see anything. It will look pitch black or it may see something but will be too dark.
Test your camera to make sure that it switches to night mode. Cover the camera with your palm (or just the light sensor) and if it works you should hear the clicking sound and the IR lights will glow reddish.
If it doesn’t work, reboot the camera (power it off), check the power source, and try again. If it’s a bad one, you need to replace the camera.

6. Get a superior low-light camera
Let’s be honest, a cheap CCTV camera will provide a basic night vision image, not clear, dark, and full of artifacts. As the saying goes, you get what you pay for. If you went cheap, don’t expect to have a reliable nighttime image.
If you intend to use a security camera in an area without lighting, insufficient lighting, or in the woods, then you should definitely go for a better camera. A better camera works better in low light conditions and sometimes there’s no need for external illuminators.
Research the market and go for a camera that is designed to work in low-light conditions. The higher the resolution the better, the more built-in IR lights the better the image. If that spot is important for you, spend a few bucks more and get a decent camera.
Make sure to check the night image demos provided by the manufacturer. Here is our recommended buying guide: 10 Best IP Security Camera Systems 2021.

7. Clean the cameras
It’s important to keep the cameras and the illuminators clean. Any dirt, dust, scratches, general pollution may cause the IR light to reflect back to the camera’s sensor.
Additionally, bugs and spiders love the IR lights for some reason, they’ll swarm to the camera. It’s recommended to wipe the camera’s glass once in 2-3 months, or at the end of each season.
Remove any spider webs that may have accumulated around the camera, the IR light from the camera hits the web and bounces back the camera, blinding the sensor and decreasing the quality of the image.
Final Conclusion
As you notice, the nighttime image quality is related to a couple of basic principles that you need to have in your mind when installing a CCTV camera.
The camera sees at night by using its built-in infrared lights, the better the IR lights, the better the nighttime image. Usually, the quality of the picture correlates with the price of the camera, if you go too cheap then nighttime images may be unusable.
Additionally, you can add external illuminators to help the camera see better. Keep in mind to install the illuminator behind the camera, or on the side.
If the IR LED lights bounce back to the camera you may cause “blinding” of the sensor which creates a washed-out nighttime image, circles rolling on the screen, or white spots. Install the camera at the right spot and avoid any nearby solid surface from where the infrared light may reflect.
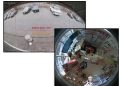
Generally speaking, bullet-style cameras are less likely to be affected by internal reflection while in dome-style cameras the IR light may easily bounce back the dome. This is the case for low-end cameras, the expensive ones are better designed.
Purchase a camera that fits your needs, research beforehand, and get one that is supposed to work well in low-light conditions. Don’t forget to wipe the camera once every 2-3 months.
Most crime happens at night, so ensure that you’re happy with the nighttime image of your CCTV cameras. If not try to make the adjustments listed in this article.