In many cases, you may need to add a camera via Hik-Connect to a remote NVR. If both the security camera and the NVR are located in a different location and both show online on Hik-Connect, you can remotely add the camera to that NVR.
In other words, it’s possible to add a camera to an NVR channel via the Hik-Connect domain. Then you can live view, playback, backup, and perform other settings on the camera directly via the NVR.
When cameras and backend devices (such as NVR) are not in the same network, using the Hik-Connect domain you can link them. The precondition is that both cameras and devices are exposed to the Internet and are able to use the Hik-Connect service.
The method demonstrated here is relatively complicated but can be done properly if you follow all the steps one by one. Follow this guide to add a Hikvison IP camera to the NVR via the Hik-Connect domain.
How to add an IP camera to an NVR through Hik
Connect domain
Below we’ve listed all the steps you need to follow in order to add an IP camera to an NVR.
1. Enable Hik-Connect function on IP camera and NVR
As we mentioned earlier, the precondition of using Hik-Connect Domain is that the devices should support
the Hik-Connect function and their status have to be Online.
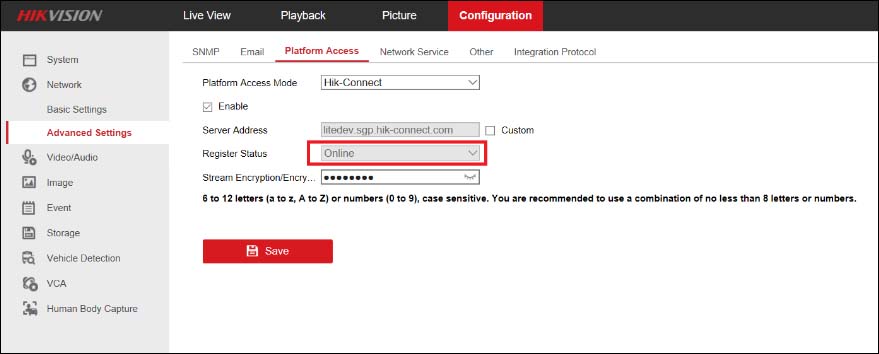
To enable the Hik-Connect, navigate to Configuration > Advanced Settings, and on the Platform Access Mode “Hik-Connect”, tick the enable box. For more details, you can consult this article: How to fix Hik-Connect status offline.
Note: The platform access can be enabled via the web browser or directly on the camera/NVR.
2. Add IP camera and NVR
When all the devices are online, you should add the IP camera and NVR into the same Hik-Connect account. We strongly suggest you use the account registered in the country/area where your devices are located. This will make the connection more reliable.
Note: The adding method we recommend here refers to add devices through Serial Number or QR code rather than IP address.
3. Port Mapping
To configure the DDNS, the public (external) IP address and port are necessary. The public IP addresses will show up on the platform when the devices are online, but port mapping is supposed to be configured manually.
The ports that need to be open are:
- NVR: HTTP port (default 80), Server port (default 8000)
- IPC: HTTP port (default 80), Server port (default 8000), RTSP port (default 554)
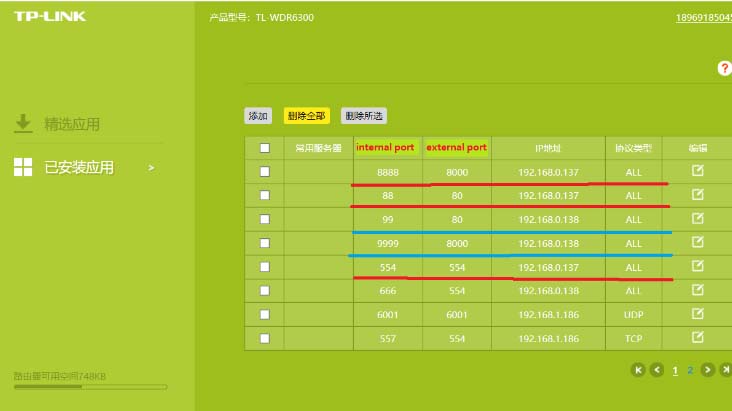
You can configure port mapping by activating UPnP on the device or configure it in the router directly. In other words, you need to open these ports on the router, or the easy way is to enable the UPnP mode (Universal Plug and Play) and the camera/NVR to open the right ports by itself.
This assumes that your router supports UPnP mode as well and most routers nowadays have this feature enabled by default.
An example is shown below. That’s a TP-Link router and the IP address of the camera is 1920680.0.137 and the IP address of the NVR 192.168.0.138. The UPnP power forwarded the ports automatically.
Note: It’s recommended to have unique ports for each device, so the camera and the NVR should have different HTTP ports and so on.
4. DDNS configuration
Once you have successfully configured port mapping and all the ports show up open, the next step is to configure the ports on the Hik-Connect web page.
Step 1. Go to Hik-Connect web page www.hik-connect.com, log in to the account that the
devices are bound with.
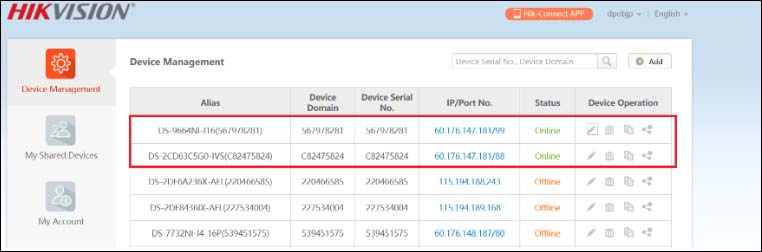
 Step 2. Find the devices listed on the Hik-Connect account (take a look at the example shown below).
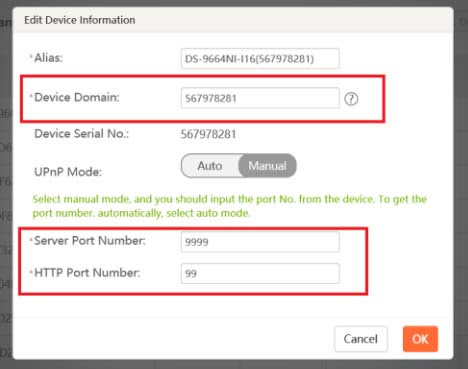
 Step 3. Click the edit (pen) icon, we suggest choosing Manual in the UPnP Mode and then type in the Server and the HTTP ports (mentioned in the third section above).
Note: Device Domain is the device serial number by default, you can edit that number if you need to. If things go well, the DDNS service should be established successfully.
 Step 4. Then you need to test out the DDNS. There are two ways how you can do that:
- Copy device link after clicking the copy icon, then paste it into the browser to access it or type
www.hik-connect.com/Device Domain in the browser where “Device_Domain” is your own domain listed on step 3. - Click the IP address followed by the HTTP port and normally you should be directed to the device’s web page. If you can visit (see/access) the devices’ webpage through one of the approaches mentioned above, that means the DDNS configuration is successfully established.
Step 5. If the test fails, there are two possible reasons:
- Wrong public IP address: the device’s IP address may have changed and didn’t update
to the platform mode. To solve this problem, we suggest you update to the latest firmware version and reboot the device (especially for IPC). - Check your router if the UPnP is supported or enabled, if the UPnP function is not supported, replace it if UPnP is supported but not enabled, activate it.
5. Add camera
You can add the IP camera to the NVR the usual way. For example, you can do it via the web browser. Click the Add button and fill out the information. On the IP Camera address: add the camera’s Hik-Connect link, it should be in this format www.hik-connect.com/Device Domain (replace the “Device_Domain” with your own domain).
The Management Port is the Server port number shown on the port mapping (step 3). Finally, type the camera’s username and password, click OK to finish the operation.
 Note: If there are multiple cameras under the same LAN that you want to add to NVR, you need to manually set IPC’s RTSP port to a different number to avoid port conflict, then follow the mapping procedure to map the ports to the public network. In other words, each camera must have unique ports.
The screenshot below shows the section where to manually set the RTSP port, you can find this page via this path: Configuration > Network > Basic settings> Port.
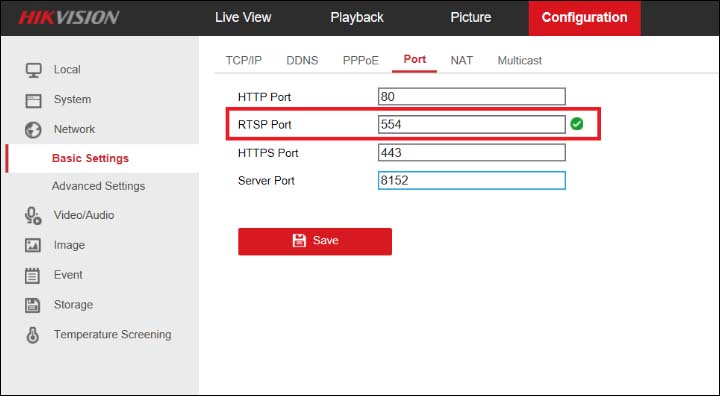 We recommend the users use the same RTSP port for the internal and external ports. The reason is that the backend devices (NVR) can only get RTSP port information through the camera’s Server port, the camera cannot find the real mapping port by itself when we use the router to do port mapping.
6. Status Online
When status shows online, the IP camera will appear in the NVR’s channel list, which will let you perform actions such as live view, playback, backup, screenshots, recordings, etc.
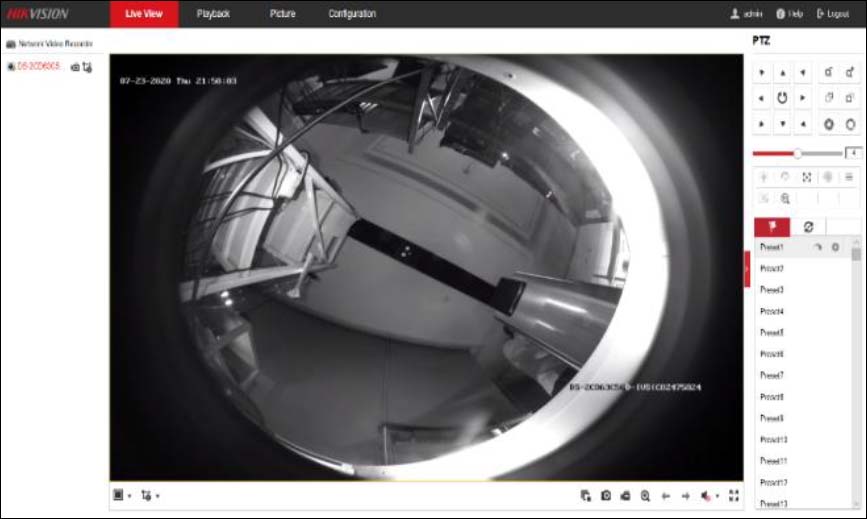
Note: If the 554 port mapping is incorrect, the status will be Offline (Failed to get stream), in this case, try to redo the settings again.
Conclusion
In this guide, we showed how to link an IP camera to an NVR via the Hik-Connect and this will make the camera show on the NVR as if it was connected straight to the NVR. Both the camera and the NVR will communicate via the Hik-Connect and, obviously, they should be under the same account.
This method is very convenient if you have the camera and the NVR in different locations but you still need to have the camera added to the NVR. Once it’s linked, you can watch the live view playback, backup, and perform other settings.
