Many Swann cameras support audio or come with a built-in microphone which enables your security system to “listen” and audio record as well the area under surveillance.
By default the audio is disabled on the Swann DVR and NVR, you need to enable it to have the system record the audio/sound.
You may need to consult a lawyer to make sure you’re allowed to record audio. Different jurisdictions have different rules for recording sound in security systems.
Keep in mind, that the camera picks up the audio, not the DVR or NVR (they simply record it). You need to have a camera(s) with a built-in mic or have an external microphone hooked to the camera iself or to the back of the recorder.
Record audio on Swann DVR or NVR
There are various types of Swann recorders on the market, each of them with a different interface. Check the models below or find out which user interface is similar to your recorder. Follow the guide step by step to enable audio recording.
Applicable for these Swann DVRs or NVRs: DVRx-1590, 1600, 4480, 4575, 4780, and 4980.
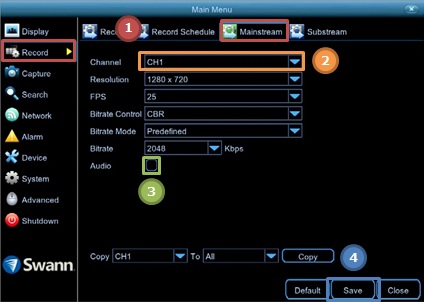
- Access Menu then go to Record then Mainstream.
- Change the Channel to where your microphone is connected (e.g. channel 1).
- Tick the box beside Audio.
- Click on Save to save the settings.
– Repeat these steps for the other channels if necessary.
– Repeat these steps on the Substream tab.
Applicable for these Swann DVRs or NVRs: DVRx-1000, 1250, 1260, 1425, 1450, 2555, 2900, 3000, 3200, 3250, 3260, 3425, 3450, 4000, 4100, 4150, 4200, 4400, 4600, 1580, 4550, 4750, 5000, and HDR6-8000, 8100, and HDR4-8200.
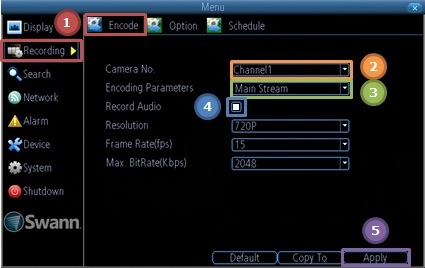
- Access Menu then go to Recording then Encode.
- Change Camera No. to where your microphone is connected (e.g. channel 1).
- Set Encoding Parameters to Main Stream.
- Click on the box beside Record Audio, it will fill white.
- Click on Apply to save the settings.
- Set Encoding Parameters to Substream.
- Click on the box beside Record Audio, it will fill white.
- Click on Apply to save the settings.
– Repeat the steps for other channels that you want to enable audio on.
– Certain recorders assign audio inputs to fixed channels. Make sure that the camera you wish to associate with the audio input is connected to the right channel.
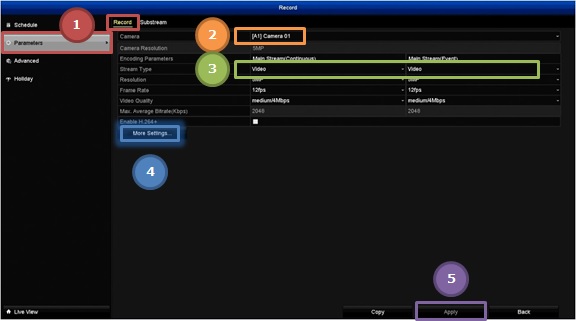
Applicable for these Swann DVRs or NVRs: DVRx-1500, 1525, 1550, 1575, 4300, 4350, 4500, 4900, 8075, 8050, and HDR8-82003
-
- Access Menu then go to Record. Choose Parameters then Record .
- Change the Camera to where your microphone is connected (e.g. channel 1).
- Change the Stream Type to Video and Audio.
- Put a check on the box beside Record Audio.
– If you cannot see it, click More Settings first. - Click on Apply to save the settings.
– Repeat the entire steps for other channels.
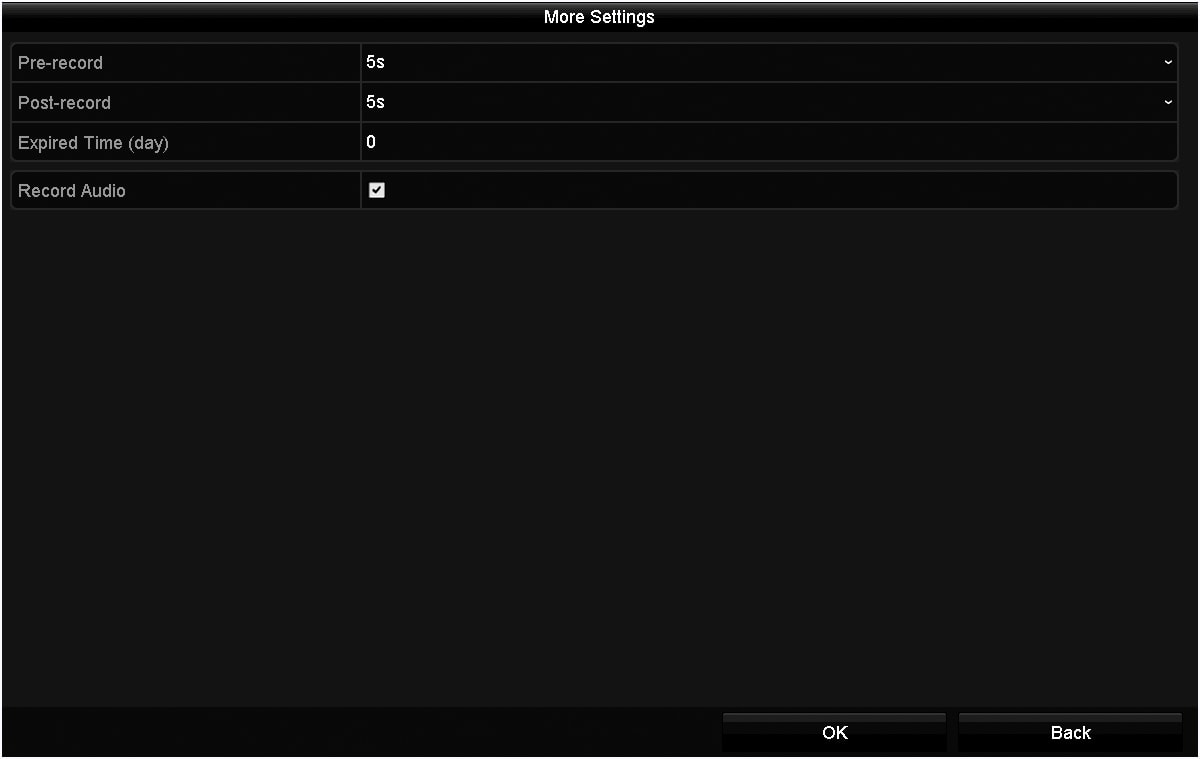
On the More Settings section, tick on Record Audio. Click on OK to Save.