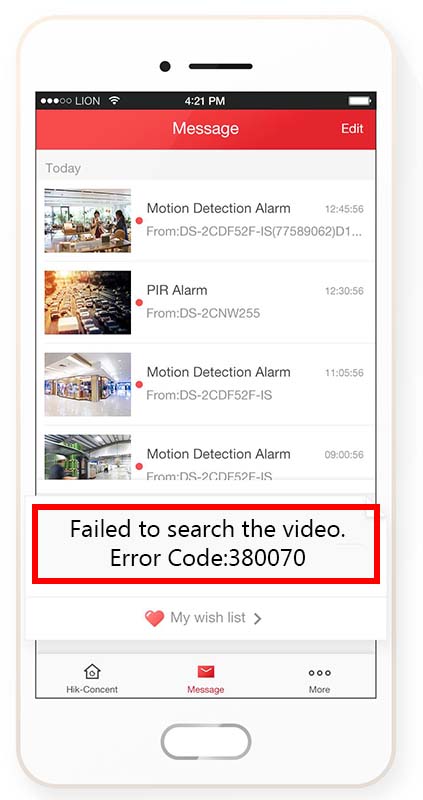
This error shows up on the Hik-Connect phone app when you have logged in via the Hik-Connect account. You’re able to get push notifications on smart events previously configured but if you click on the alert and try to see or playback the embedded in the alert, it will display this error message: Code: Failed to search the video. Error code: 380070.
Practically, the alerts are rendered useless because you can’t view what it was for. This error shows on Android phones mostly, and less on Apple devices. To fix this error you need to re-do the settings from the scratch and also make sure the app and the Hikvision recorder’s firmware are updated to the latest version.
In technical terms, Hikvision error code 3800700 (failed to search video) occurs due to a misconfiguration and communication error between the CCTV device (DVR, NVR, IP camera) and the Hik-Connect server.
How to fix Hik-Connect error: Failed to search the video. Error Code: 380070
This error is related to network problems when the Hik-Connect and recorder are linked together, specifically the NAT/DST settings. Hikvision hasn’t addressed the issue officially yet, so to fix it you need to start “from scratch” and re-do the settings.
Check the Network Settings
For more follow the steps below. You can complete them via a web browser or directly via NVR’s interface. Depending on the model the layout of the menu may be slightly different, but the logic is the same.
Step 1. Temporarily disable Hik-Connect in the NVR. Navigate to Network > Advanced > Platform Access and on your phone, sign out on your Hik-Connect app. Since you’re planning to make changes, it makes sense to bring the app connection offline. This step is quite important because it will “refresh the settings”. 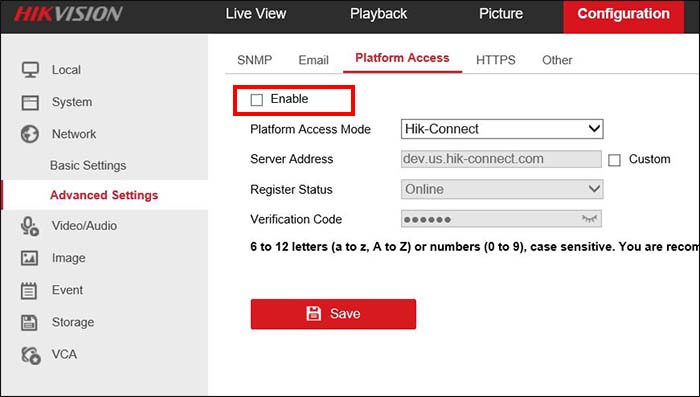 Step 2. On the NVR, go to the Main Menu > Network section > TCP/IP. Ensure the Enable DHCP box is unchecked and that you have a static IP address and the right information entered on the other fields (relevant to your local network).
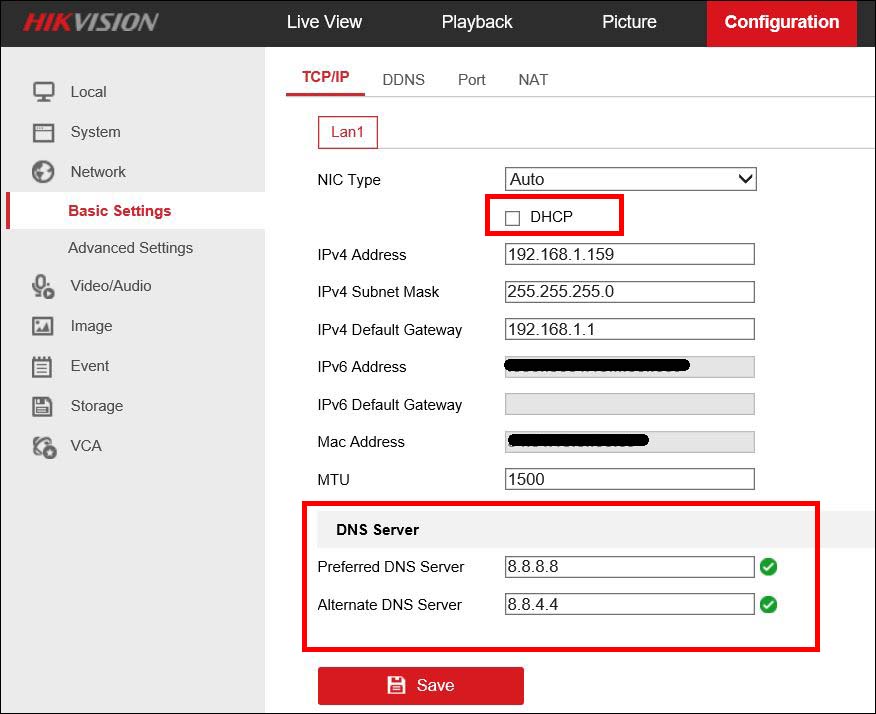
For example IP address: 192.168.1.100, Subnet Mask: 255.255.255.0, Gateway: 192.168.1.1, Preferred DNS: 8.8.8.8, Alternate DNS: 8.8.4.4. It’s crucial when using port forwarding to use a static IP address.
A useful trick: You can do this way, enable the DHCP, wait for the device to get all the settings automatically from the network. Once all the fields are filled out, disable the DHCP and Save the settings. Make sure to add the Alternate DNS to 8.8.8. and Preferred DNS 8.8.4.4.
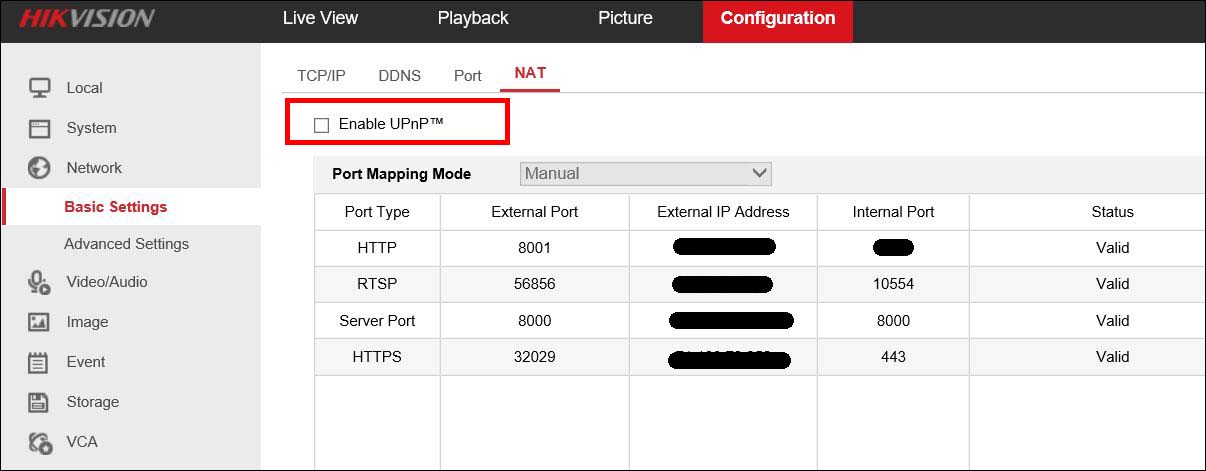
Again on the NVR go to Network > NAT. Ensure the Enable box of UPNON is unchecked/disabled. Having the NAT function enabled when using port forwarding may cause issues. In simpler words, NAT will open up the ports automatically on the router, which may cause some sort of conflict if you previously have done port forwarding. You should not enable UPNP since you’ll do the port forwarding manually on the router.
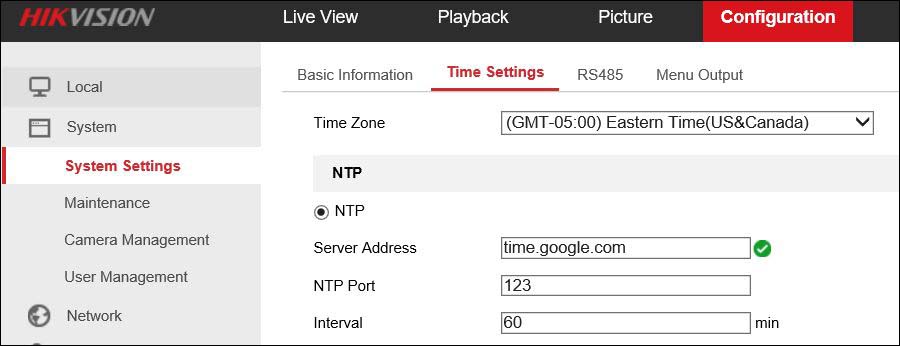
On the NVR, go to Network > NTP. Enable, Interval 60, Server: pool.ntp.org, Port: 123; this keeps your NVR time and all the connected cameras synchronized. Or use the google one, as shown on the image below.
Navigate to Main Menu > Network > Advanced > More Settings. Change the default HTTP, Server, and RTSP ports. For example HTTP: 82, Server: 8001, RTSP: 4900. The default ports are well documented online and should be changed if using port forwarding to reduce illegal access attempts.

Once you do that, access your router on the web browser via its IP address and type the router’s username and password.
- Access your router’s config page, find the port forwarding section (google it if you can’t locate it), and set up a rule/rules to forward (using the example above, modify as to suit your local network) TCP ports 82, 8001, 49000 to 192.168.1.100. Select “both” (UDP/TCP). Port forwarding varies from router to router, if you’re stuck just google the router model followed by port forwarding.
- Check out if the ports are indeed open. Go to canyouseeme.org and find out if the ports show open. If “success”, it means the port is open.
- Go back to the NVR. Network > Advanced > Platform Access. Re-enable Hik Connect option. Reboot the NVR if it doesn’t go back online.
On the phone app:
- Log back into your Hik Connect app.
- In Hik Connect to the right of your site click the settings icon > Configure DDNS. Port Mapping Mode-Manual, Server Port: 8001, HTTP Port: 82 (or whatever port numbers you used), User Name: admin, Password: the NVR’s password.
- Try again and see if the error shows again. Make sure you’ve configured the smart alerts settings as desired. We assume you did since you were getting alerts (although not being able to playback).
Check the Alert Settings
If still the same issue, then re-check the configuration of the alerts.
- Configure just one alarm from scratch using the NVR local menu (not the camera’s web interface). Start with one channel only, for example, a camera that gets a lot of motion such as the front door one.
- Set the trigger action for only full-screen monitoring at this point.
- Define the motion/line/intrusion area, set the sensitivity options that are available to you, and also the alarm actions.
- Observe and prove that the alarm is working as it should locally. You should see the bell icon on the screen and your multi-screen image goes to full screen on the camera when triggered.
- If that works properly, enable the trigger action for Notify Surveillance Centre and see if you get anything through the app.
Update the phone or NVR
This the last thing, but actually it should be done first. There are always bugs on the phone app of the firmware that gets iron out over time by the manufacturer. So, first of all, make sure the Hik-Connect app is updated to the latest version.
Then, check if there’s any new firmware for the NVR. Search using your model, or simply contact the Hikvison or the reseller and they’ll email you the right firmware. Update it and try again. Quite often the errors are related to software bugs.
