The HTTPS function ensures secure access to web services by adding digital signature certificate authentication. In other words, the HTTPS protocol safely encrypts the data between the web browser and the IP camera (or the NVR, DVR).
In this guide, we will show how to set up the HTTPS certificate and access your Hikvision in a secure manner. The steps are valid for any Hikvision device such as an IP camera or NVRs, including the branded or non-branded ones. If you’re not sure if your device supports this function, just check if there’s an HTTPS section on the menu.
How to set up HTTPS on Hikvision devices
You create the HTTPS for the camera individually or for the NVR or DVR. Then when you access the device’s IP address you should see the “https://” on the URL address. All the data between you (your browser, computer) and the camera will be encrypted and cannot be “seen” by third parties.
There are a few methods on how to create an HTTPS authentication. You can either create a self-signed authentication or use signature authentication of third-party CA institutions.
Method 1. Self-signed authentication
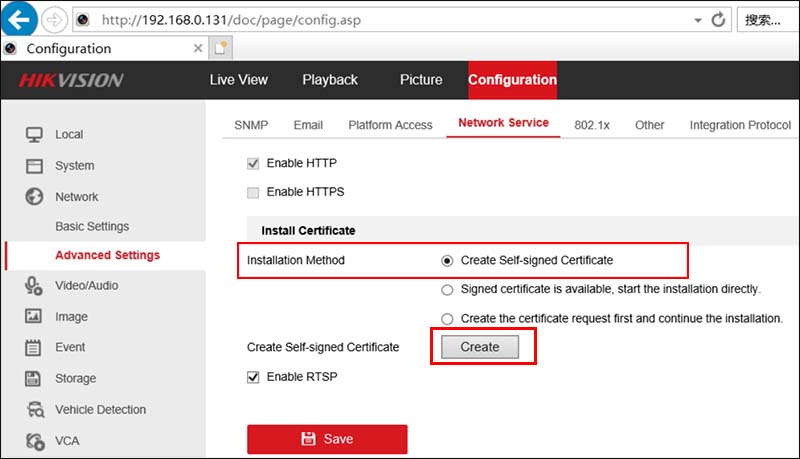
Access your device via the web browser (type the IP address of the device in the URL bar and then enter your credentials). Navigate to Configuration > Advanced Setting > Network Service.
On the Install Certificate selection, select the “Create Self-signed Certificate” option. Hit the “Create” button.
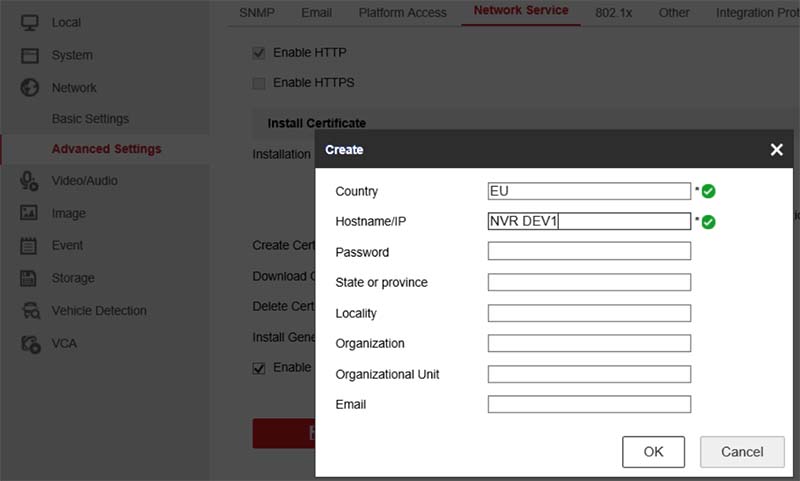
On the next window, fill out the first three lines of the form: Country, Hostname/IP (add a name for your system), Validity (for example you can add 1,000 days which is around three years). Click OK.
 Next, you should come back to the Network Service section. Now you need to check the HTTPS option. Hit the How to create HTTPS on Hikvision NVR or IP camerabox. Below you can see the Installed Certificate and the Property. Click Save to apply the settings.

After completing these steps, you can access NVR by HTTPS. However, since the self-signed certificate is not very secure, the browser will recognize it as a “certificate prompt”, which is normal.
If the customer has high-security requirements, it is recommended to use the third-party CA organization to sign the certificate (read the next section).
Method 2. Signature authentication of third-party CA institutions
In this case, we will create a certificate application file. On the Network Service click “Create the certificate request form and continue the installation”. Then hit Create.
 On the next window, fill out the first two lines on the form as shown below (add your own Country).
 Download the certificate application file and submit it to the third-party CA organization for authentication. Explain to the CA certification authority that you need to apply for a certificate in PEM format.
A certificate authority or certification authority (CA) is an entity that issues digital certificates. A digital certificate certifies the ownership of a public key by the named subject of the certificate.
This allows others (relying parties) to rely upon signatures or on assertions made about the private key that corresponds to the certified public key.
A CA acts as a trusted third-party—trusted both by the subject (owner) of the certificate and by the party relying upon the certificate.
A free-of-charge CA authority is https://letsencrypt.org. Request an HTTPS certificate and they’ll generate one for free.

After receiving the certificate from the third-party CA certification authority (in the following form), import the certificate into NVR. As we said, the certificate should be in PEM format.
 After importing the certificate, you can access NVR by HTTPS. The certificate can only be used by the NVR that initiated the authentication, and cannot be used by other devices.
 The same steps can be followed when using an IP camera, or DVR. It will work as long as the device supports the HTTPS function and almost all Hikvison logo and OEM units support this feature.
The recommended method is to get an HTTPS certificate from a CA authority and then upload it to the NVR/DVR or IP camera.
You can obtain a free certificate from the Letsencrypt organization and just go through the steps. And next, you access your security device via the web browser you should see the “HTTPS” in the URL bar indicating that the connection is secure.

I have issue with this CA Certificate, when i’m downloading file format contents is encrypted , when i send this certificate , Certificate vendor said that certificate is invalid and has an error. I trying to create certificate using openssl and send it to Certificate vendor they said is valid and they send me certificate pem , then i try to upload and installing but I’m still getting same issue “Upload Failed”. is any specific to upload using another method , we need it for public publishing. i also try to enable SSH but has error “Device Busy” , i’m using DVR Hikvision , do you have any solution for error issue what i faced it