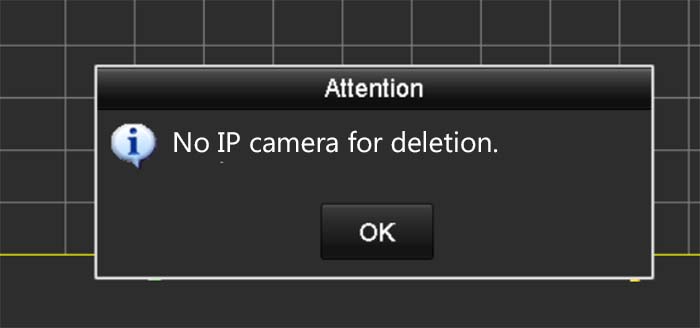
It can get frustrating when you get the “No IP camera for deletion” in your Hikvision NVR. The error shows up when previous IP cameras were added to the NVR and were never deleted from the NVR’s database.
This kind of error is more of a configuration error. It’s common if you had cameras connected to the back of the NVR and then you disconnected them physically while the machine was running.
Basically, the NVRs “sees” these cameras because they were added before or because the cameras are still actually on the network (although you don’t need them anymore). Hikvision NVR “remembers” and has the cameras listed on its database.
Here’s a common scenario of how you get this error. You got a PoE NVR (with a built-in PoE switch at the back), you have plugged all the cameras to the back and normally the NVR will bring them online by using the Plug-n-Play feature. Or you can add them manually by clicking “Add IP camera”.
When you click OK, you may get a “No more cameras allowed” message which indicates that the NVR’s channels are maxed out (although, they aren’t).
Then when you try to delete any existing camera configuration, you get an error message “No IP camera for deletion”.
Hikvision: No IP camera for deletion (quick fix)
Fixing this issue is easy. You can either manually edit the information for the channel that shows the “no IP camera for deletion” message, or you can reset the NVR to factory default (which will erase the NVRs memory, hence, get rid of the previously registered cameras).
An easy way is just resetting the NVR. Go to the System Setting and choose the Reset option. It will bring the NVR to factory default and erase all the previous settings, including clearing the memory from the previously saved cameras.
 You can reset also from the web browser menu by going to Configuration > Maintenance > Upgrade & Maintenance > Restore.
This option will keep all the rest of the parameters such as user settings, but default the camera settings.
 Another way (and the one we recommend) is by manually editing the information of the channel that shows this error. Go to the camera list on the NVR (or web browser) and click the Edit button (it looks like a pencil).

When you click it, a new screen shows up and you can enter the camera’s information manually. You need to add settings such as the IP address of the camera, camera manufacturer, protocol, port number, and credentials (username and password).
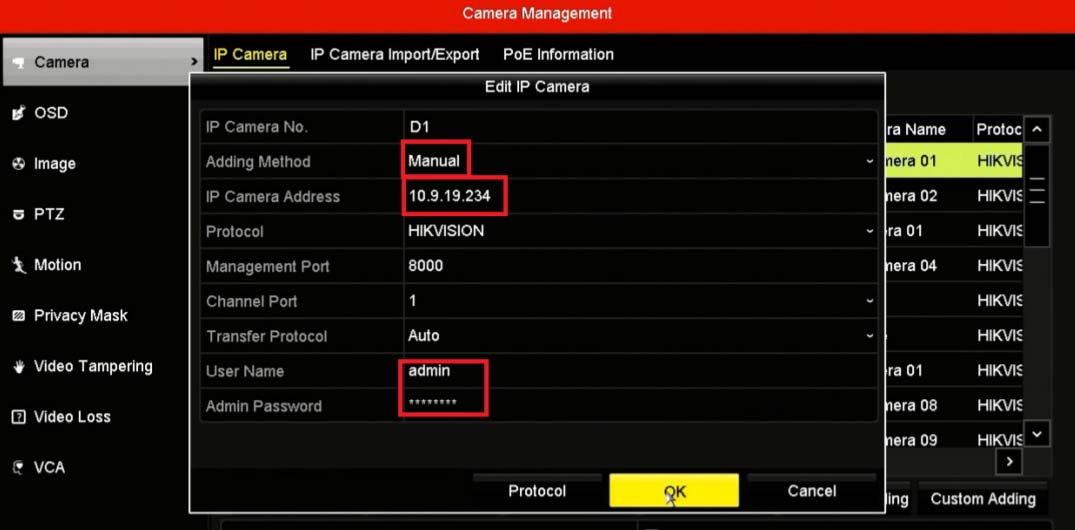 Once the information is entered, click Ok and the NVR will communicate with the camera and you should see the live image in the small window.
Now the error will not show anymore, and the camera will be displayed online. Repeat the same procedure for the cameras that exhibit this error.
If for some reason this doesn’t work, then you can do the reset procedure shown in the first section of this guide. If you get a “No more IP camera allowed” message, then consult this guide.
