Hik-Connect is an app made by Hikvision that allows you to see the cameras remotely using your phone or tablet. It works for the Hikvision logo and OEM devices (sold under other brands) and it’s available for iOS and Android.
You can add your camera systems (such as NVR, DVR) to the Hik-Connect using three methods: Cloud P2P, Hik-Connect DDNS, and IP/Domain. All these three methods are explained in detail below.
Note: With the termination of the service of Hik-Online, the devices previously registered in HiDDNS will not be able to use the HiDDNS service for remote login.
It is recommended that users use Hik-Connect to add their devices. So, Hik-Online is discontinued and you need to use the Hik-Connect instead.
Add Device to Hik-Connect using Cloud P2P
Before you start, you need to prepare the devices:
Upgrade your device to the latest version that supports Hik-Connect. It’s always recommended to keep all your devices up to date, especially the security-related equipment.
Enable the Hik-Connect function on the device and ensure it shows online. The procedural path: Go to Main Menu > Configuration > Network > Advanced Settings > Platform Access.
Here you have to choose Hik-Connect or Cloud P2P in Platform Access Mode (there may be differences between different devices). Also, set the verification code, which will be used for device adding.
Some devices may not allow user-defined verification codes.
If so, users can find the verification code on the label. If there is no verification code on the label, the device verification code is ABCDEF. More details can be found here.

Download the Hik-Connect app. Users can download and install the latest version of the Hik-Connect app by visiting the Hikvision app store at appstore.hikvision.com on their computer or mobile phone.
 Register and log in Hik-Connect account. In the next step, you need to create an account.
Users can register their Hik-Connect account through the Hik-Connect app or website by using their mobile phone number or email.
The address of the Hik-Connect website for different countries is as follows:
- US and most of the world: www.hik-connect.com
- Russia: www.hik-connectru.com
- India:india.hik-connect.com

Basically, follow the prompts and fill out any required information. Once you’re registered, log in to the account through the mobile phone Hik-Connect client.
Adding steps via P2P
Once the above steps are finished, you can add the device by scanning the QR code or entering the device SN manually.
Scanning the QR code of the device label.

Or you can enter the device SN manually
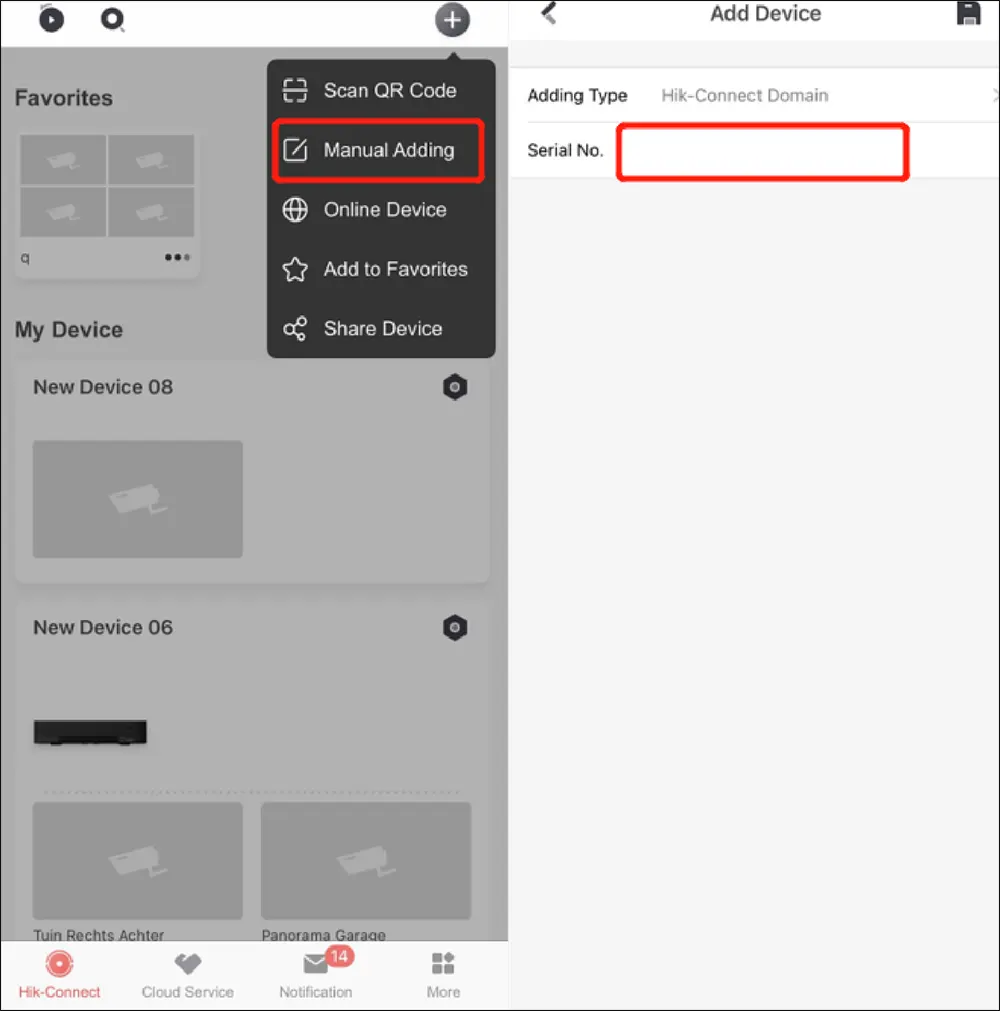
Click “Add”.

Enter the verification code set previously to complete the adding process.

Now the device will automatically complete the binding process with the account. For some older device models and versions, additional Hik-Connect DDNS needs to be configured to live view and playback in the app.
Later, we will show how to configure Hik-Connect DDNS in the app.

Add Device to Hik-Connect using Hik-Connect DDNS
The full name of Hik-Connect DDNS is Hik-Connect Dynamic Domain Name Service. Once a device is added to a Hik-Connect account, the Hik-Connect DDNS server will allocate the device serial number as the default Hik-Connect domain name.
Users can edit the domain name later via the Hik-Connect APP or web portal. Hik-Connect DDNS provides a mapping relationship between a domain and the device’s external IP ports.
Adding a new device via Hik-Connect DDNS
Step 1. First, you need to do port forwarding for the device on the router or through the UPNP function (enable the UPNP on the NVR/DVR settings and click Apply to save the settings).
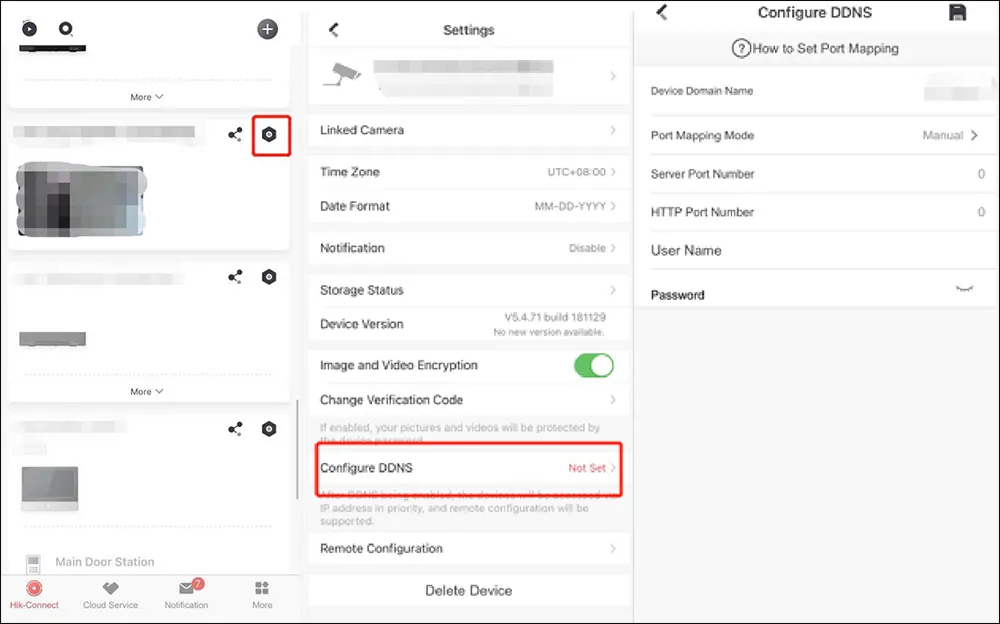
Step 2. Then Click Configure DDNS after adding the device successfully through Cloud P2P. Select port mapping mode as manual. Input external server port and HTTP port set in step 1.
Input the username and password of the device. Tap the Save button on the top right corner.

For devices that already exist under the Hik-Connect account
Step 1. Do port forwarding for the device on the router or through the UPNP function itself. Tap the Setting button into the device setting interface;
Step 2. Click Configure DDNS. Select port mapping mode as manual. Input external server port and HTTP port set in step 1.
Input the username and password of the device; Tap the Save button on the top right corner.
Keep in mind:
- After completing the DDNS configuration, the phone app will directly access the stream through the Hik-Connect Domain (IP and port), including live view and playback.
- After DDNS is configured correctly, more remote configuration options will be available on the app (meaning, you can adjust certain settings directly through the app).
Add Device to Hik-Connect using IP/Domain
For devices that do not support the Hik-Connect service, you can also add devices to the Hik-Connect app through IP/domain. Follow the steps below:
Step 1. Launch Hik-Connect App.
Step 2. Add the device by entering the IP address, port number, username, and password manually.

Once you have completed the adding process, users can live view, playback, and make some remote configuration adjustments.
Since it is not necessary to register a Hik-Connect account to add a device in this way, it means that the device is not bound to the account, only bound to the current mobile phone.

Keep in mind:
- If the mobile phone and the device are in the same local network (LAN), the LAN IP and port can be used to add the device. If the mobile phone and the device are in the public network, the device needs to be mapped to the public network, and the public IP and port can be used to add the device to Hik-Connect.
- The devices added through IP are different from those added through the Cloud P2P domain in function. Some functions that must rely on cloud services, such as device sharing, alarm, notifications, etc., are only supported when added through Cloud P2P. So, by using the IP/domain method, you may be limited on the functions you can perform through the app.
Note: These instructions are valid for Hikvision branded cameras or their OEMs which included the following brand names: 3xLogic, ABUS, Acegear, Activecam, ADJ, Advidia, Alarm.com, Alibi, Allnet, Alula, Anaveo, Annke, Arcdyn, Armix, Aukoo Technology, Aventura Technologies, Avue, Cantek, CCTVStar, ClearWay, Covert Security, Dax Networks, DMP, Dodwell BMS, DSS, Dunlop, DVR Unlimited, Ellipse Security, Epcom, Esypop, Ezviz, Gess Technologies, Global Network Security, GovComm, Grundig, GVS Security, Hinovision, Hitachi, Hitosino, Honeywell, Hunt CCTV, Hyundai Security, Infinite Pixels, Inkovideo, Innekt, Interlogix, Invidtech, JFL, Jlinks, LaView, LTS, Mercury Security, MicroView, Nelly’s Security, Norelco SafeCam, Northern Cameras, Novicam, NTT, Oculur, Onix. Power Technology, Protect Group, Raster, Remark Thermal, RVi, Safety Vision, Safire, Scati, SecurityTronix, Sentry CCTV, Sharp, Siqura, Smart CT Solutions, SnapAV / Luma, Space Technology, Syscom, Technomate, Toshiba, Trendnet, Vantage Security, Vezco CCTV, Videoteknika, Winic CCTV, Zicom.
