Some Hikvision camera models feature a LED floodlight that can help the camera deliver better image quality at night time.
This guide will show you how to log into the Hikvision camera and make adjustments to the integrated floodlight.
The camera’s floodlight can be so useful in many different scenarios. Keep in mind that this is not a traditional Infrared LED Light that you normally see on security cameras, this is a real white Flood Light, very bright and noticeable.
There are options on the settings and you can set the floodlight to come on/off as sort of a dusk to dawn light, so when the light levels drop so low the floodlight turns on which also helps the camera to see in color a lot more crisply.
Additionally, you can adjust the light level sensitivity as to when the floodlight turns on/off.
You may also select to put the floodlight on a timer and have it automatically turn on/off at a specific time of the day. You can also edit the intensity of the floodlight’s light output in the camera’s interface.
There are a lot of ways how you can utilize this camera to improve the image quality at your location. Or you can choose to completely disable the floodlight altogether if that’s what you wish.
How to adjust the floodlight on a Hikvision camera
If the camera is connected to an external switch, you can access it by locating the IP address of the camera and typing it in the URL bar of your browser.
If the camera is connected to PoE NVR (which goes straight to the back of the unit) you will first need to enable Virtual Host in the NVR otherwise the web interface of the camera will not be easily accessible. This article shows how to enable Virtual Host.
Once you’re logged into the camera’s web interface navigate to Configuration and then System > System Settings on the left. Now on the top-right, click the tab labeled External Device. Here you can adjust the Hikvision LED Floodlight settings.
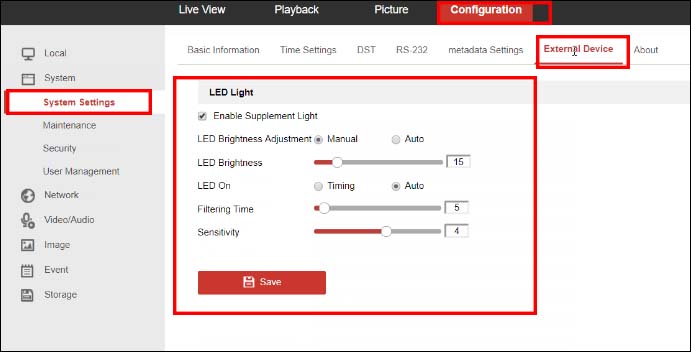
The floodlight functions listed in this section are explained below.
Enable Light
Enable Supplement Light: Enable or Disable the floodlight. If you don’t like this feature at all, just turn it off using this option.
LED Brightness
LED Brightness Adjustment: This comes in two options Manual or Auto. Manual allows manual adjustment of the brightness of the light.
The Auto option will automatically adjust the brightness of the light depending on the available surrounding light.
LED On/OFF
LED Brightness (Manual or Auto): Use the slider to adjust either the overall brightness of the light if Manual is selected or the maximum brightness the light will achieve when Auto is selected.
LED On (Timing or Auto): When Timing is selected you have the ability to set a Start and End time to turn the light on and off.
Basically, the floodlight will turn on/off based on your selected timing. When Auto is selected the camera will automatically turn on and off the light depending on the amount of available light.
Filtering Time & Sensitivity
Start Time & End Time (Timing) and Filtering Time & Sensitivity: Start time and End time can be set for the time of day the light should turn on and off, respectively.
Filtering Time is how long the camera will wait to switch the light on and off, the default value is 5 seconds Sensitivity is how sensitive the camera will be to changes in light, default is 4. A higher sensitivity means that the floodlights will turn on when there’s less outdoor light.
