iVMS-4200 is a camera management software that is made and maintained by Hikvision. It can be used to monitor, playback, adjust settings, and manage the cameras from a computer or a laptop. So, instead of doing all the surveillance via the DVR or NVR, you can perform everything from a computer.
It’s very convenient if the unit is installed somewhere else, and you can manage everything from the comfort of your chair.
This easy-to-follow guide shows how to configure the iVMS-4200 software, how to add your camera system, how to modify settings, etc. The instructions serve as a good start for someone who just installed the software on the computer and is looking forward to managing their cameras.
How to initialize iVMS-4200 software
The first thing that you have to do is download and install the iVMS-4200 on your Windows PC or Mac.
Once the software has been installed, you can open iVMS-4200 and use the Device Management screen found in the Device Management tab and to add, configure new and existing devices, as well as remove devices.

How to add a new device on iVMS-4200
To add a new device (which can be a standalone IP camera, DVR, NVR) click on the Add button located under the Device for Management header.
If you are adding a device that is on your local network, you should see it listed at the bottom under Online Device. If you do see it, just click on it then click Add + under Online Device.
If you are adding a device remotely (that is on the internet), you should click Add + under Device for Management near the top middle area of your screen.
Add window
Then you should see the Add Window with default settings on Adding Mode of IP/Domain. The most commonly used modes encountered here are IP/Domain and Cloud P2P.
 Nickname: Enter a name for the location such as “my home”, “my store”, etc. This nickname is used to identify your system/location in the iVMS-4200 client in case you have a lot of systems added for display.
Address: Enter the IP address or Dynamic DNS name for the device. It can be just an external IP address of the DDNS hostname. If you’re not sure, check with the installer or inspect the phone app and mirror the settings.
Port: 8000 (this is the default one unless you have modified it).
User Name: This is the username of your security camera system. This name may be admin or a different name if you’ve created another account.
Password: This is the password used on or set up on the Hikvision system. In other words, it’s the password of your NVR, DVR, or standalone IP camera.
Synchronize Device Time: Leave this box un-ticked.
Export to Group: Leave this box checked.
Once all fields have been entered and confirmed correct, click the Add button. Once it is added, click the Next button. Click Finish when complete. That’s all, your system has now been added.
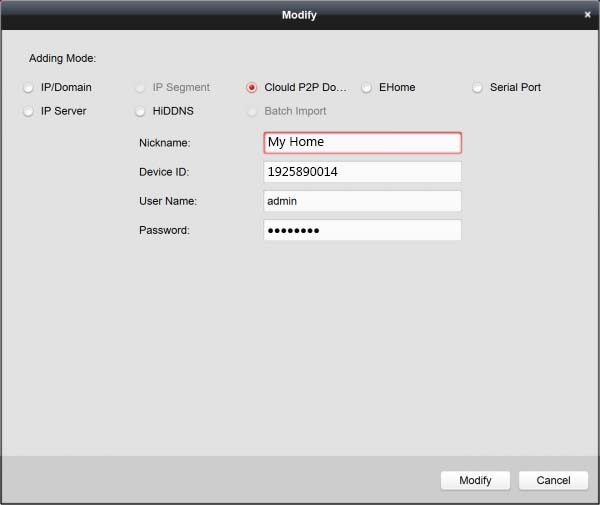
Cloud P2P Domain (via Hik-Connect)
New Hikvision devices can now use a Hikvision cloud-based P2P method for connecting and viewing cameras remotely over the internet without the need to open any ports or make special rules on the firewall.
 To add a Hik-Connect or Cloud P2P device, you should:
- Click on Add New Device Type button listed under the Device Type in the Device Management screen.
- Place a checkmark next to Cloud P2P Device and click OK.
- Click on Cloud P2P Device now listed under Device Type in the Device Management screen.
- Click the Login button shown and enter your Hik-Connect user information and click Login or if you do not have an account, click on Register and fill out the information requested.
Once added, come back to this screen and add the devices to iVMS-4200 by placing a checkmark next to the device(s) and clicking the Add button.
 If you do not go through these steps you’ll see a message that says: “Please log in to the Cloud 2P2 account first before using this function.”
Note: You can create a Hik-Connect account, log in, change sharing settings, and more by using the Hik-Connect app
Modifying a Device
To modify an existing device, click on the device listed and choose the Modify option under the Device for Management heading.
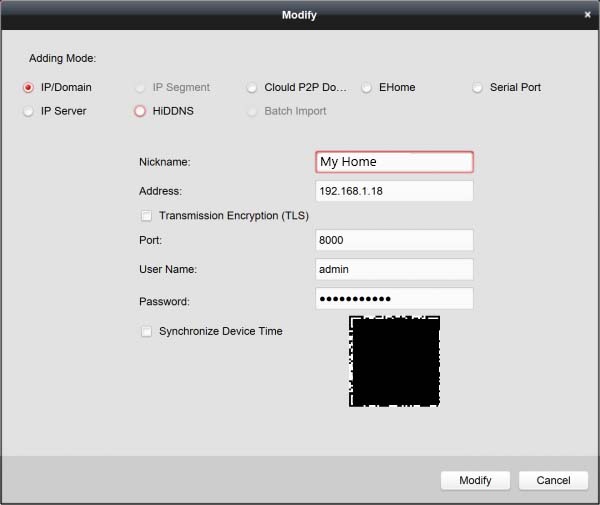 Nickname: Enter a Nickname for this location’s system. This nickname is used to identify your system/location in the iVMS-4200 client. For example, you can use “home”, “store”, “building 1”, etc.
Address: Enter the IP address or Dynamic DNS name for the device. You should get this information from the installer or on the device’s settings.
Port: 8000 (this is the default port)
User Name: This is the username of the DVR or the NVR. This name may be admin or a different name if you have created other accounts
Password: This is the password used to access the DVR or the NVR
Synchronize Device Time – Leave this box unchecked
Once all fields have been entered and confirmed correct, click the Modify button. If all is done correctly, your system has now been modified!
Add Devices via the Video Wizard
This is another method to add your system to the iVMS-4200. Access the video wizard by clicking on Help > Open Video Wizard at the top of the iVMS-4200 application. Click on the Device and Storage Schedule Configuration button and follow the prompts in the wizard.
Adding the Stream Key
If you get this error message: The video is encrypted Input the stream key to view the video error.
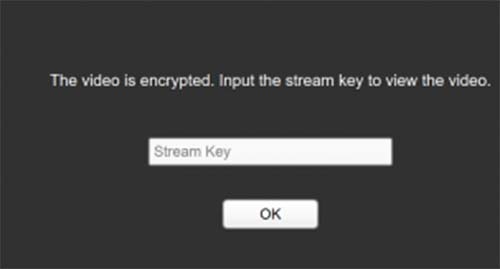 To increase security, Hik-Connect camera connections require a stream encryption key to be inputted before the live video will play. This is done to encrypt the whole streams and to avoid a hacker from being a middleman between you and your security system.
Enter the encryption key in the box and click the OK button for each camera connected. You can also add and copy the key to all cameras on the Device Management screen.
Add, Modify and Copy the Encrypted Video Stream Key via the Device Management screen
To add, modify or copy the stream key, click on Device Management > Group > find your camera number or name then highlight it by clicking on it then click Modify.
You can also copy the stream key to your other cameras by clicking on the Copy to… button. We always recommend encrypting your videos in order to increase the overall security of your system.
