The IP camera WiFi not working or the IP camera not connecting to your WiFi or the IP camera can’t find WiFi is a common issue on CCTV security installations.
Your wireless security system will be compromised if the network connection goes offline when using wireless IP cameras. If no internet connection, the non-standalone wireless IP cameras can’t send out the video feed to the NVR.
There are many reasons why an IP wireless camera cannot connect to the internet and these factors vary from one manufacturer to another. Many end-users ask questions such as: Why my wireless camera is not connecting to the WiFi?
Why the wireless IP camera goes offline? Why the IP camera doesn’t connect wirelessly? Why the WiFi camera says failed to connect on the phone? Why P2P doesn’t work? Why my WiFi security camera goes offline?
 All these questions will be answered in this detailed article. We will explain the main causes and offer tips on how to fix a WiFi security camera that doesn’t connect to the internet or to the WiFi. Read each entry carefully and let us know if you have any questions.
Why a wireless IP camera cannot connect to WiFi?
Here is a list of the main reasons why your WiFi security camera isn’t connecting to the internet or isn’t working on WiFi.
- WiFi coverage is not strong enough. The wireless IP camera may be too far away from the router or the access point.
- The wireless IP camera doesn’t have sufficient power and usually, the WiFi cameras tend to use more power than regular IP cameras.
- The antennas on the wireless IP camera are loose. Make sure they’re tight and pointed properly toward your router.
- Wrong WiFi password entered on the wireless IP camera.
- The wireless IP camera is not connected to your WiFi but to a different one.
- You set the wrong IP address on the wireless IP camera.
- Your router may be old and doesn’t support the camera’s WiFi channel.
- The firmware on the camera is old (you need to update it).
- Your internet is unstable and isn’t working properly.
- There’s a lot of interference that can cause drops in the WiFi signal.
- The P2P option on the wireless IP cameras is disabled (or it was never enabled in the first place).
- The router’s firewall isn’t allowing the wireless camera to connect.
How to fix a wireless IP camera not working or connecting to the internet
If your stand-alone wireless IP camera or a wireless IP camera system is not connecting to the internet/WiFi or the IP camera goes offline or simply fails to connect, try these solutions to fix the connectivity issue.
1. Make sure the wireless IP camera has sufficient power
Check if the wireless IP camera is getting powered. Inspect the power supply and make sure it’s working fine. Ensure that none of the cables is loose or wonky. Confirm that the power outlet is working properly.
If you’re using battery-powered WiFi cameras, check if the battery is charged. If not, replace the battery and try again. Usually, most wireless IP cameras come with status LED lights, to see if the power lights are on.
2. Make sure the password is correct
Many people type the wrong WiFi password on the IP camera and they wonder why it doesn’t connect. The connection may fail simply because you typed the wrong password. Make sure you’re using the right password.
Type it slowly and don’t add extra spaces. Also, don’t forget the WiFi passwords are case sensitive. If you don’t know the password, access the router settings and you can see it over there.
3. Adjust the IP camera antennas
Check if the antennas on the camera are fixed well and they’re not loose. Point them to the area where your WiFi router is located.
When the camera is shipped, the antennas are not installed on the camera. Once you deploy the wireless camera, make sure the antennas are tightened properly.

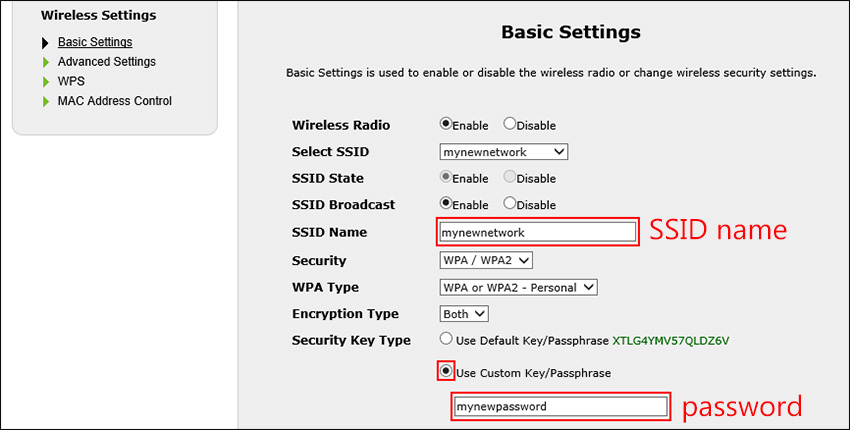
4. Check the SSID (wireless network) in your router
In other words, SSID is the name of your WiFi, when you search for it you should be able to see it on your wireless camera.
However, some wireless IP cameras require entering the SSID manually. In that case, make sure you’re selecting the correct WiFi network and that you’re typing the name correctly.
5. Make sure the WiFi signal is strong
If your WiFi coverage is weak, the wireless IP camera won’t be able to establish a stable connection with the WiFi. It may connect for a few minutes, then disconnect, and so on. Or in some cases, the IP camera is so far away from the router that it can’t even detect any WiFi signal.
Check the distance between the wireless IP camera and the router and make sure the distance can be covered by your WiFi signal.
To get the right information, you may need to check the manufacturer’s specs and keep in mind that walls and other barriers can weaken the WiFi strength.
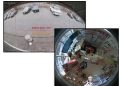
Additionally, you can log in directly to the IP camera and check how many bars are on the WiFi strength icon. An example is shown below.
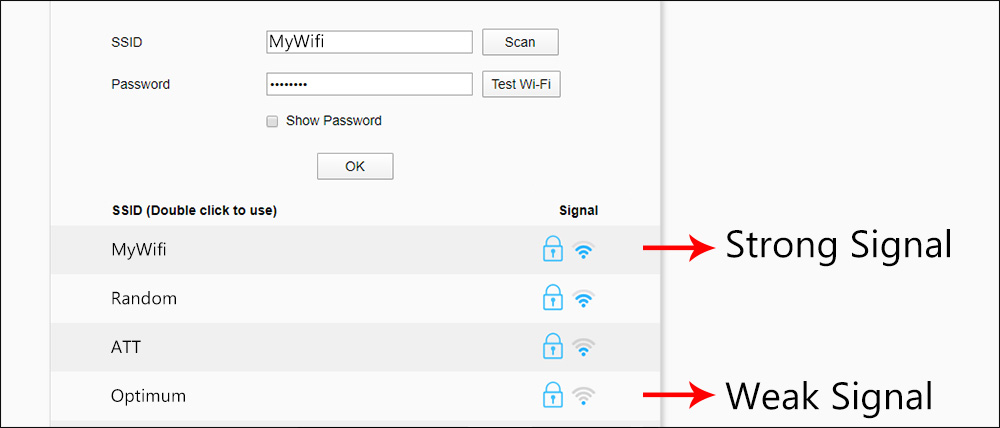 If the WiFi signal is one or two bars, it means that your camera is too far away from the access point. In this case, bring the camera closer to the router and see if the wireless camera connects to the internet.
If it does, then you have a WiFi coverage issue. Also, you can buy a WiFi booster or extender for the router to extend the signal of your WiFi (especially if you place the camera outdoors).
6. Avoid interference by changing the frequency band of your router
If you have many devices connected to your router, the whole network may become slow and congested. In that case, many devices on the network will struggle to stay online, for example, the wireless IP camera may go randomly on and off.
Especially, routers set to the 2.4GHz frequency band are more prone to experience congested and interference issues.
The 2.4GHz frequency is used by other routers around your home, and by other devices in the house such as phones, tablets, laptops, or even microwaves. All these devices may cause signal interference.
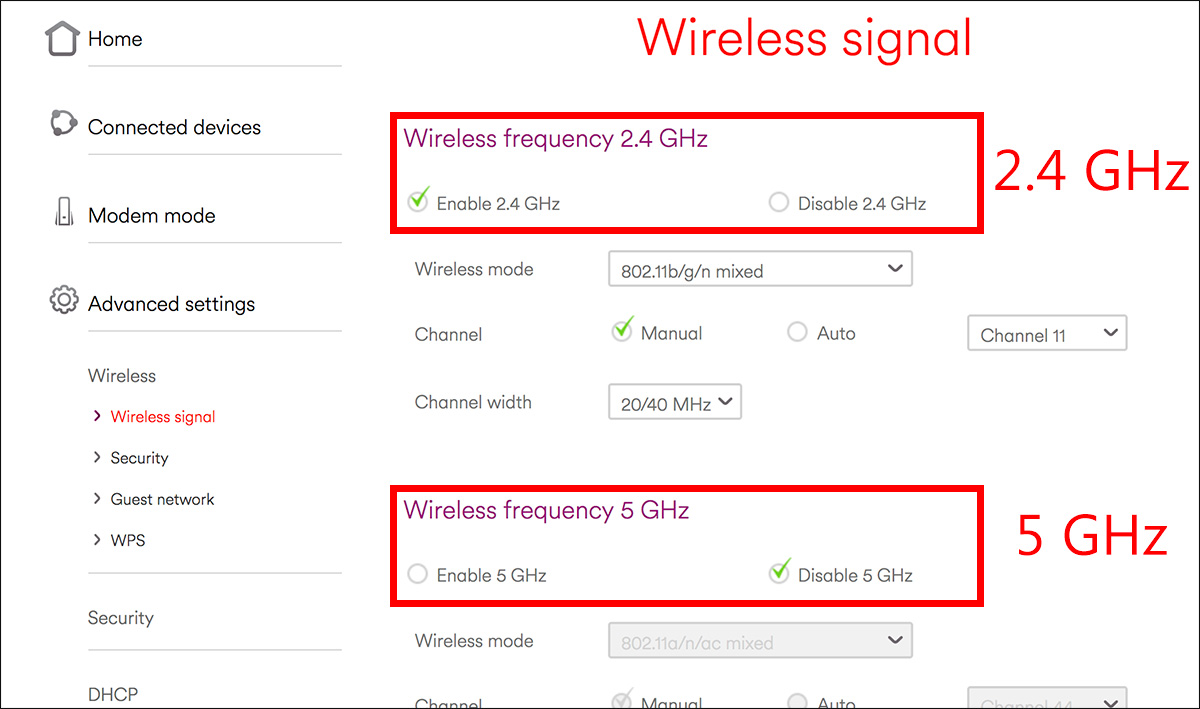 This is where dual-band WiFi cameras are useful which are wireless cameras designed to work on 2.4GHz and 5GHz frequency bands.
So, if your wireless camera is struggling to stay online on the 2.4GHz frequency band, simply access your router’s settings and change the frequency band to 5GHz which will greatly reduce the chances for congestion or interference. At least it’s worth trying.
7. Check the router’s firewall
This doesn’t happen often, but sometimes the wireless IP camera is not able to connect to the WiFi because the firewall on the router doesn’t allow the communication to go through.
In this case, you need to access the router’s settings, adjust the firewall settings (such as excluding the IP address of the camera) and try again to see if the camera connects.
8. Make sure the IP address on the camera is correct
In some cases, when you set up the wireless IP camera via a network cable and then disconnect the cable (in order to be wireless) the camera self assigns a different IP address that doesn’t match the one from your local network.
Let’s say, while the camera is wired you set the IP address to 192.168.1.100, and then once you unplug the cable the IP address changed to 192.168.0.100. In this scenario, you can’t see the camera. Double-check to make sure the camera is maintaining its IP address.
9. Update the firmware on the camera
Let’s be honest, many wireless IP cameras are shipped out with unstable firmware. You may have tried everything and still, the camera keeps going offline or not connecting at all. It’s always recommended to check the manufacturer’s (or seller’s) website if there’s a new firmware available.
You need to understand that each IP camera is like a tiny computer that runs on certain algorithms that sometimes contain many bugs.
So, keep your camera up to date. Not just your camera, but the router as well and the phone app you use to connect to the camera.

The P2P option on the wireless IP cameras is disabled (or it was never enabled in the first place).