This article with show you how to set up the motion detection email alerts on Hikvision equipment. The procedure is the same for NVRs, DVRs and Hikvision logo or OEM IP cameras.
1. Enable the motion detection
The first step consists of enabling motion detection on your Hikvison recorder or IP camera. By default the motion is disabled. You can complete this step directly on the recorder via GUI or through the web browser.
In this guide, all the settings are done via the web browser (Internet Explorer or Mozilla Firefox, Chrome doesn’t work).
Type the IP address of the device on the url bar of your browser (for example: 192.168.0.200) and login using your username and your password. Install the plugin if the browser asks you to.
Go to the Configuration > Event> Basic Event and then Motion tab. Here you enable motion detection, at the same time you can modify the area you need to be covered and the sensitivity. If you have a recorder, you need to do these settings for each camera.

2. Enable the email alerts
Make sure the email alerts are turned on and the arming schedule is correct. Go to Linkage Method and check the send email option, as shown on the picture below.

On the Arming Schedule you can set the schedule when you need the alerts enabled. Let’s say you need these alerts only during a certain time frame. In this sample we set the schedule 8AM-8PM. So only during this time frame we will get alerts.

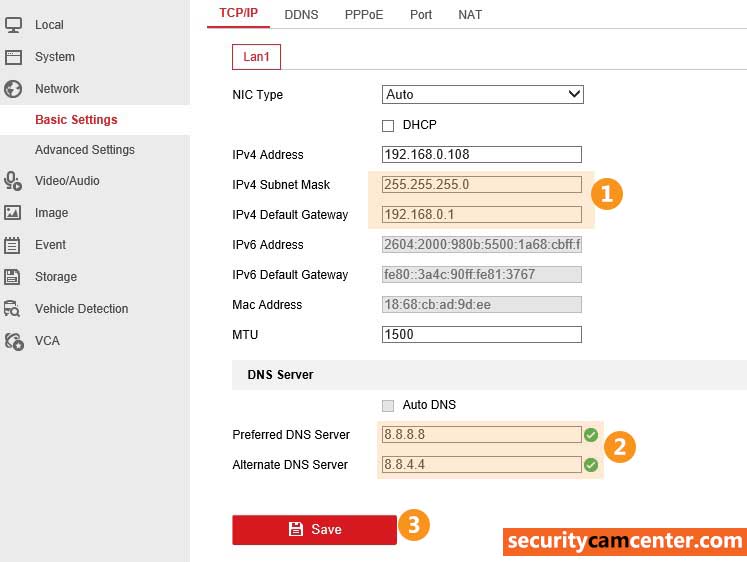
3. Configure the network (internet) settings on the NVR or camera
In this step you need to make sure the network settings on the camera/NVR are correct and that the device can connect to the internet and subsequently send the email alerts out.
et the correct subnet mask, default gateway (of your router) and DNS servers (for these you can use the DNS servers from Google).
4. Configure the email settings
You need at least two email accounts to make this work. One is going to be the sender and the other one the receiver. The sender can be a dummy email just to bounce the email from the camera/NVR to your email.
For this service, you can create an account on Gmail, Yahoo, Outlook or GMX. Fill out the settings as shown below (in this demonstration we used Gmail).
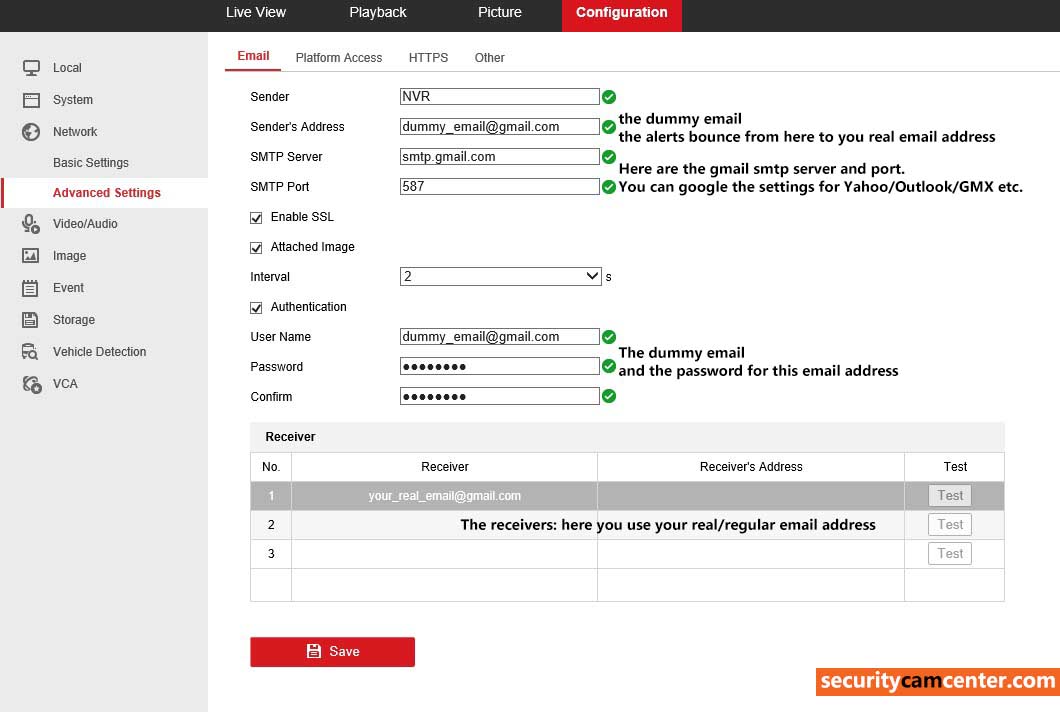
When you’re done click the Test button. You should see the “Testing Succeeded” message and receive a test email at the receiver’s address. Don’t forget to save your settings.

Common issues with the Email notifications
- No longer receiving alerts from Hikvision.
This is because Gmail/Yahoo/Outlook automatically moves these emails to the Spam/Junk folder. Make to sure to choose the option to treat the sender address as a trusted email address. - My Gmail/Yahoo/Outlook account is blocked.
This happens when these email providers think you’re spamming (sending out a lot of emails) and subsequently block/erase the whole account. You can ask their support for help. Or you can try other email providers that don’t have this issue such as GMX. - The snapshot I’m receiving shows no person there.
Play with the interval setting and on the Motion settings of the camera set the triggering area smaller and on high sensitivity. You may need to test out this particular part till you get the desired result. Sometimes the motion gets triggered by the leaves, trees, flyers, rain/snow etc.

I have followed every step exactly and have also tried with gmail & gmx emails as senders but I continue to fail the test.
You port setting is wrong. Try 587.