When setting up a professional IP camera on your home or business network, there are important steps to ensure everything runs smoothly.
These steps involve configuring your network settings so the camera can be easily accessed both within your local network and from the internet.
To do this, you’ll need to use specific commands from a computer (either a PC or Mac) that’s connected to the same network as the camera.
One command you’ll use is called ‘ping.’ It’s like sending a quick message to the camera to see if it’s responding. If it replies, you know it’s connected properly.
Another command is ‘ipconfig.’ This command tells your computer about the network it’s on, helping you understand how everything is connected.
Lastly, there’s ‘tracert.’ This command traces the path between your computer and the camera, showing you any stops or delays along the way.
In this guide, we will list and explain the most useful network commands for security camera installations and setups. You will need these commands no matter if you’re a professional or a DIY camera installer.
Command to find the IP address scheme of your network: ip config
Whether you’re using a wired PoE camera or a WiFi security camera, it needs an IP address that matches your local computer network (LAN).
To figure out your network’s scheme, follow these steps on a Windows PC (this computer needs to be connected to the same network as the camera system):
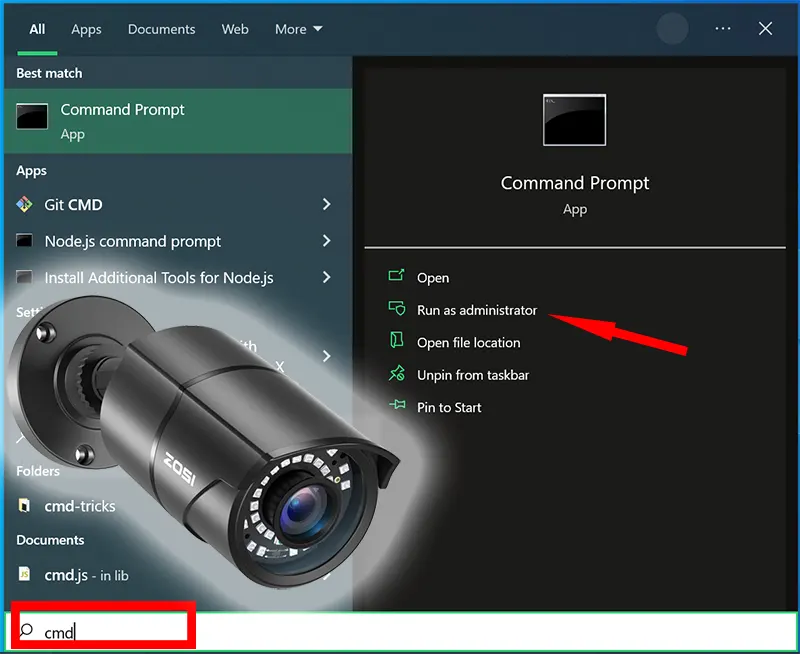
- Open the Command Prompt: Press the Windows key, type “cmd,” and press Enter.
- In the Command Prompt window, type “ipconfig” and press Enter.
- Look for the “IPv4 Address” under the network adapter your computer is using. It usually starts with “192.168” or “10.0.”
- Note down the IP address and the subnet mask.
As seen on the screenshot, we can find the router’s IP address format (in this case, 192.168.1.1), the computer’s IP address (192.168.1.4), the default gateway, and if you scroll a little bit down, the subnet mask.

With this information, we can assign the correct IP address to the IP camera or to the whole security system.
Once you know your LAN’s IP address scheme, you can choose an IP address for your camera that fits within it.
Make sure the camera is connected to the main router on your network if you plan to access it remotely using our free app. This will ensure that the app’s QR code viewing method works smoothly.
Command to confirm an available IP address: ping
Once you understand your LAN’s IP address scheme, you can choose any available IP address for each camera.
To check if an IP address is available, you can use the ping command on a Windows or Mac computer.
Here’s how it works:
- Open the Command Prompt on the Windows system.
- Type “ping [desired IP address]” and press Enter. (for example ping 192.168.1.100)
- If the IP address is available, you’ll see a “no reply” message in the command window. This means the IP address is not in use by any device on your network.
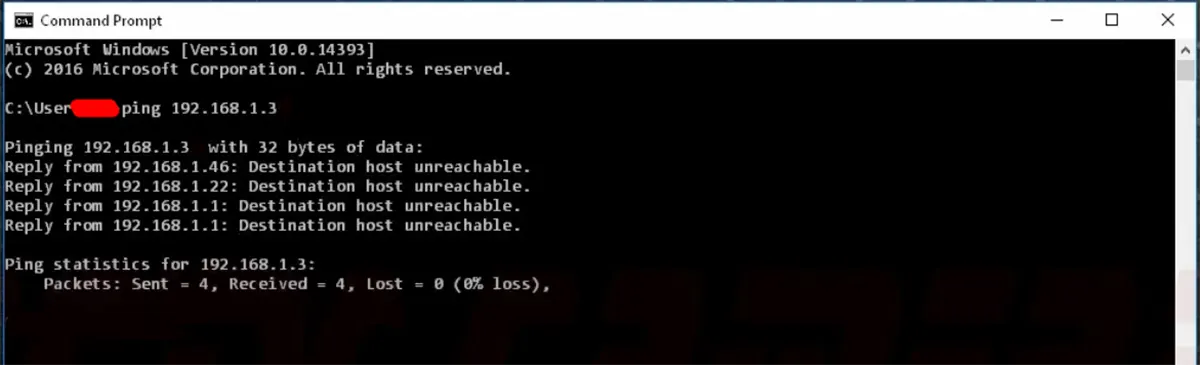
Let’s say we want to ping an IP address and find out if it’s available. For example, let’s ping 192.168.1.3. As you can see, the replies note that the “host is unreachable”.
This means that there’s no device on the network using this IP address.
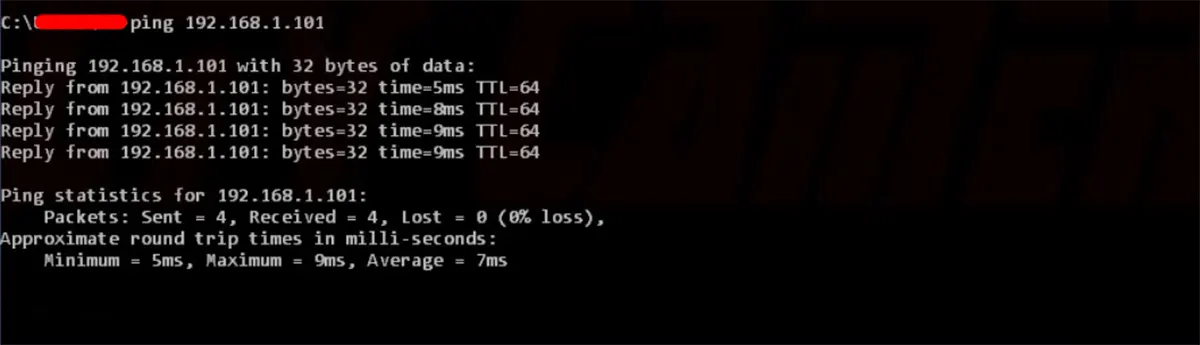
Now let’s ping an IP address of a current device on the network. As you can see on the screenshot, we get a reply when we ping it, which means there’s a device on the network using this IP address.
Using the ping command helps ensure you assign a unique IP address to each camera, avoiding conflicts within your network.
If you’re using the same IP address for two cameras (or other devices), then the IP conflict will result in the camera going offline and coming back online, thus interrupting the surveillance.
If your camera is randomly in and out, check if there’s an IP conflict.
Command to confirm that router is the main internet router: tracert
If you want to use the convenient remote viewing feature, the so-called “P2P” connection, which basically works by scanning the QR code via the phone app, then you need to make sure the router setup is correct.
If you connect the camera to a mesh network, a secondary router behind the main one, or a network behind a corporate firewall like Sonicwall, the remote viewing won’t work easily.
That’s why it’s essential to check your network before adding the camera.
Here’s how you can do it:
- Open the Command Prompt on Windows or Terminal on Mac.
- Type “tracert [camera’s IP address]” (on Windows) or “traceroute [camera’s IP address]” (on Mac) and press Enter.
The command will show you the path your network takes to reach the camera. If the camera is connected directly to the main router, the path should be short and direct. If it’s connected elsewhere, there may be additional hops or stops along the way.
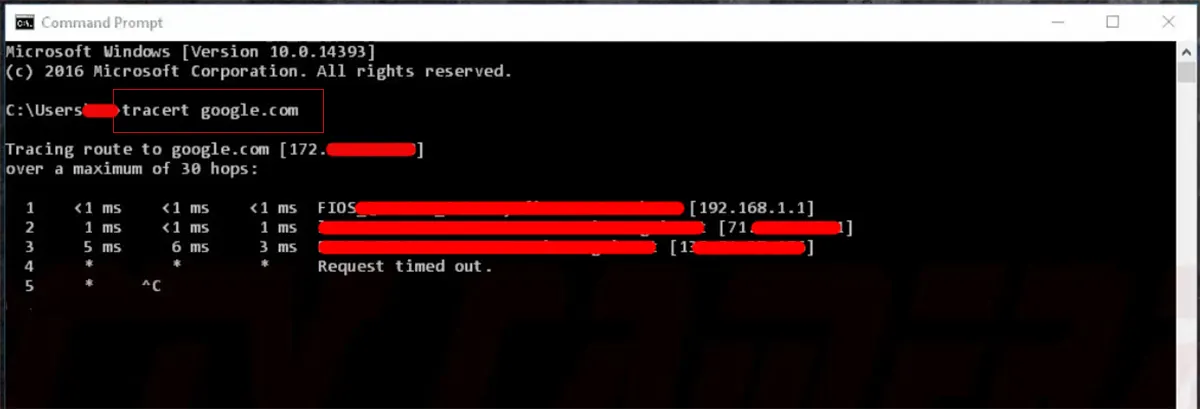
As can be seen on the screenshot, you can enter the command tracert google.com and wait for the system to show the first 3-4 lines of information.
The first line is the router’s IP address, the next line is the external IP address of your system, the last one is the IP address that hits on Google.
Basically, the signal follows the path: router, external, google. This way you know the IP addresses on your local network.
Using the tracert or traceroute command helps you understand the network setup and ensures the camera is connected in a way that supports remote viewing with the QR code scanning feature.