Having a two-audio through your Hikvision security system may improve your overall security. In this article, we will explain how to set up and start a two-way audio communication between the Hikvision IP camera (or DVR, NVR) and Client (iVMS-4500, iVMS-4200).
Hikvision IP cameras that end up with a –S on their model names support audio function, for these kinds of cameras you can get not only the live video but also the real-time audio. Two-way audio could be used for only one camera at a time.
Some cameras such as DS-2CD2412F-I (W) have an internal built-in microphone and speaker, however, for most Hikvision IP cameras, external microphone and speaker are required to be added separately.
Another thing that you need to keep in mind is that the two-way audio could only be realized between IPC and client, like between iVMS-4500 client (phone app) and IPC, iVMS-4200 client (computer software) and IPC, not between IPC and IPC or client and client.
Before we start, make sure you have these stuff prepared: Hikvision IP cameras which support audio function; external microphone & speaker; client software such as iVMS-4200 or iVMS-4500.
How to plug external microphone and speaker to Hikvision IP camera
Hikvision IP cameras have different audio placements on their motherboards. You need to open up the camera and locate the spots where you can connect your external microphone or speaker. Each camera is different, but you open up one it won’t be difficult to do the connection. Below are two examples. Consult this article as well: How to connect an external microphone to a Hikvison camera.
Hikvision 21XX Network Camera. In the picture below, the audio interface is number 11.
 Hikvision 63XX Network Camera. In this picture below, the audio in (mic) interface is 9 and the audio out (speaker) interface is 10.
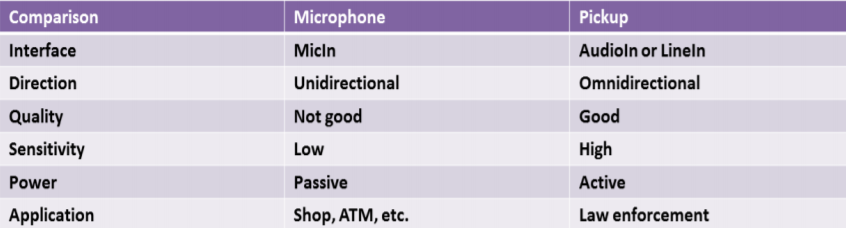
 Plug the microphone into the audio interface and plug the speaker into the audio out terminal. Both should be labeled (in some cases as AI and AO). Usually, the microphone doesn’t require a power supply, however, a few of them do. Check the table below for more details.
How to start two-way audio via web browser
Step 1. Login to your camera via the web, enter your username and password. (If it asks you to install the plugin: read here).
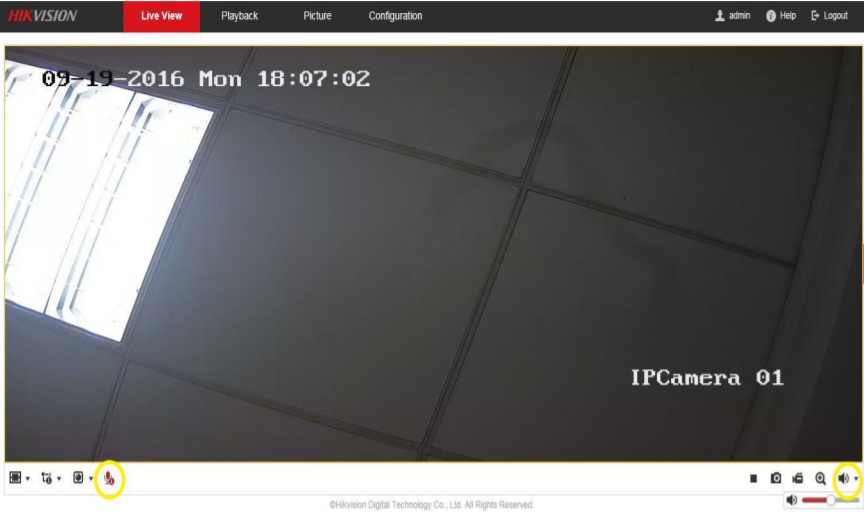
Step 2. Enable the audio output as well as the two-way audio by clicking the buttons shown in the yellow circles below. The Red Microphone icon means two-way audio is ON.
How to start two-way audio via iVMS-4500 app
Step 1. Add your camera to the iVMs-4500 app, make sure the camera shows up correctly.
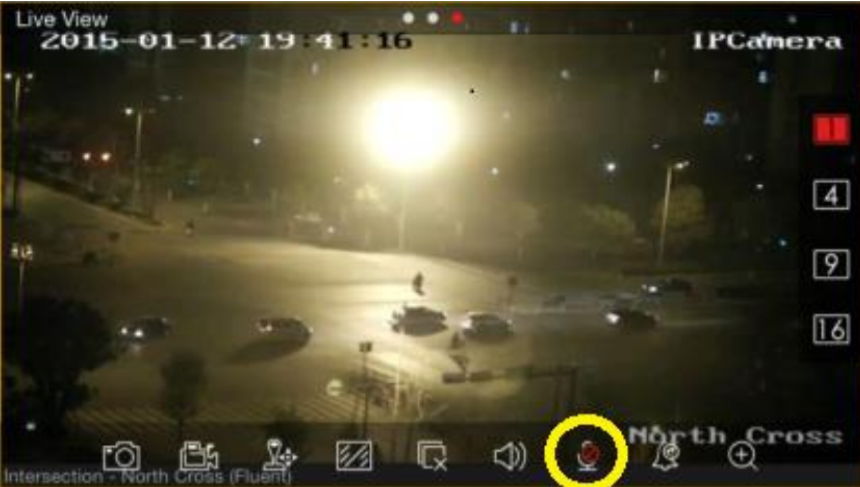
Step 2. Click the microphone to enable two-way audio. If there’s a red line over the microphone that means it is disabled.
How to start two-way audio via iVMS-4200 (computer software)
Step 1. Add your camera to iVMS-4200 client. Make sure it’s working correctly.
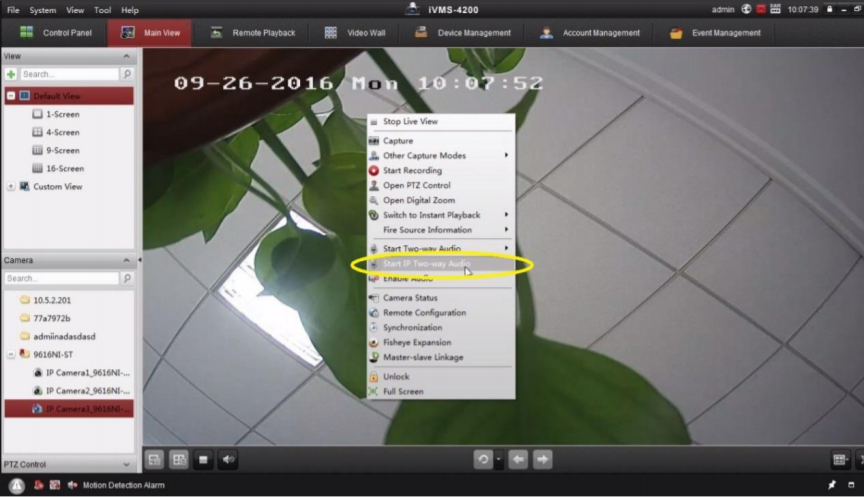
Step 2. Go to Main View, enable the Audio Output, then right-click your mouse in the live view interface and select Start Two-way Audio.
 Step 3. If you add your IPC to NVR and this NVR is added in the iVMS-4200 client, you need to select the Start IP Two-way Audio to speak to your IPC. If you select Start Two-way Audio, you will speak to the NVR.