In this article we will explain how to reset the Avigilon cameras. There are many reasons why you may need to reset the camera such as lost password or if the camera no longer functions as expected. After the reset, Avigilon cameras go to the default settings (factory settings). For each Avigilon camera line, the firmware revert button and the camera reset process is shown below (read the applicable models carefully). Note that resetting the camera will erase any previous settings on the camera, including the credentials (username/password).
H4 Fisheye Cameras
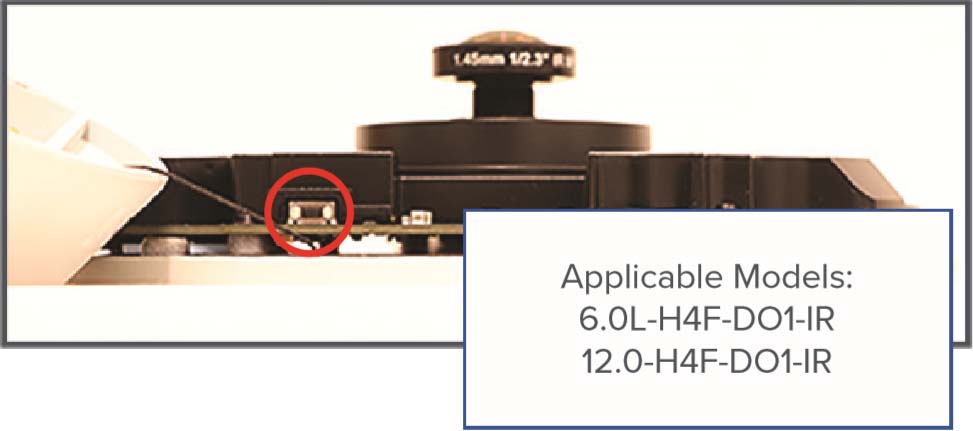
Applicable models: Avigilon 6.0L-H4F-DO1-IR, 12.0-H4F-DO1-IR.
1. Ensure the camera is powered on.
2. Remove the dome cover.
3. Press and hold the revert button.
4. Release the button when the LEDs beside the revert button turn off.
5. Wait while the camera reverts to factory default settings.
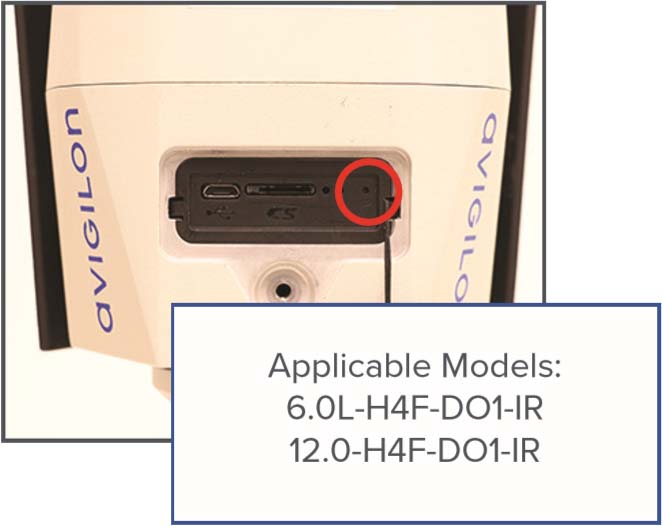
H4SL Bullet Cameras
Applicable models: Avigilon 6.0L-H4F-DO1-IR, 12.0-H4F-DO1-I.
1. Ensure the camera is powered on.
2. Using a straightened paper clip (or similar tool), gently press and hold the revert button.
3. Release the button after 3 seconds.
Caution: Do not apply excessive force. Inserting the tool too far will damage the camera.
H4SL Dome Cameras
Applicable models: Avigilon 1.3C-H4SL-D, 1.3C-H4SL-D-IR, 1.3C-H4SL-DO-IR, 2.0C-H4SL-D, 2.0C-H4SL-D-IR, 2.0C-H4SL-DO-IR, 3.0C-H4SL-D, 3.0C-H4SL-IR, 3.0C-H4SL-DO-IR.
1. Ensure the camera is powered on.
2. Using a straightened paper clip (or similar tool), gently press and hold the revert button.
3. Release the button after 3 seconds.
Caution: Do not apply excessive force. Inserting the tool too far will damage the camera.

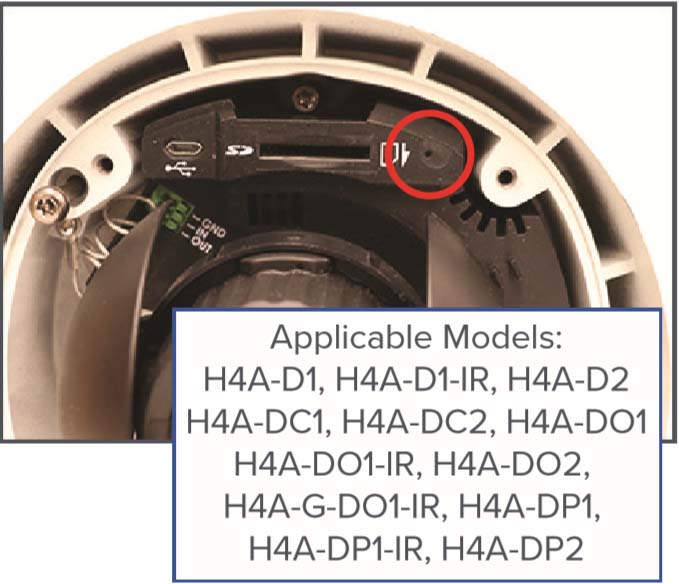
H4A Dome Cameras
Applicable models: Avigilon H4A-D1, H4A-D1-IR, H4A-D2 H4A-DC1, H4A-DC2, H4A-DO1, H4A-DO1-IR, H4A-DO2, H4A-G-DO1-IR, H4A-DP1, H4A-DP1-IR, H4A-DP2.
1. Ensure the camera is powered on.
2. Using a straightened paper clip (or similar tool), gently press and hold the revert button.
3. Release the button after 3 seconds.
Caution: Do not apply excessive force. Inserting the tool too far will damage the camera. All H4A Dome variants use this procedure, but mounts will vary.
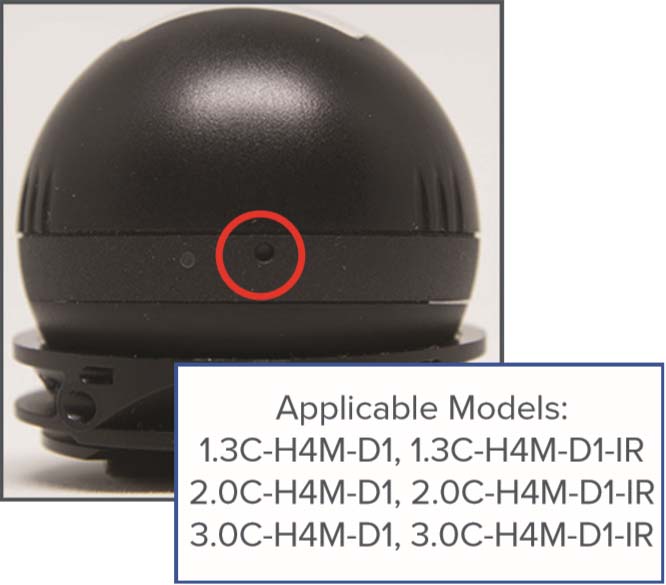
H4A Mini Dome Cameras
Applicable models: Avigilon 1.3C-H4M-D1, 1.3C-H4M-D1-IR, 2.0C-H4M-D1, 2.0C-H4M-D1-IR, 3.0C-H4M-D1, 3.0C-H4M-D1-IR.
1. Ensure the device is powered on.
2. Using a straightened paper clip (or similar tool), gently press and hold the revert button.
3. Release the button after 3 seconds.
Caution: Do not apply excessive force. Inserting the tool too far will damage the camera.
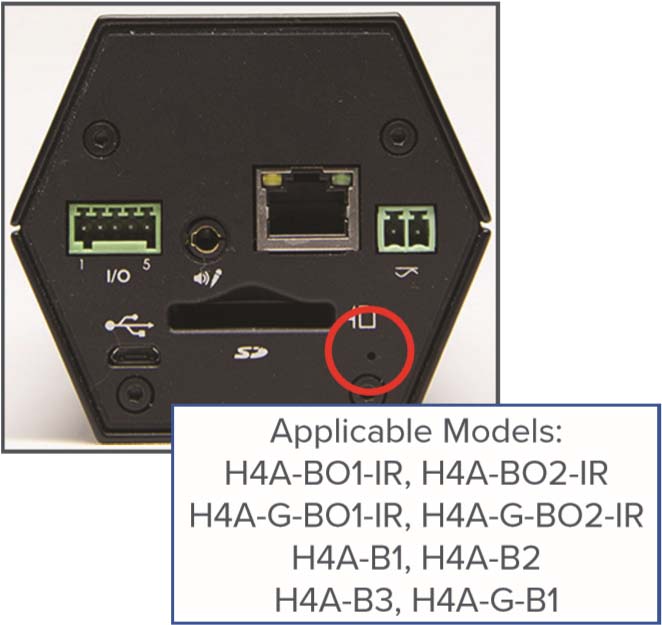
H4 HD Cameras
Applicable models: Avigilon H4A-BO1-IR, H4A-BO2-IR, H4A-G-BO1-IR, H4A-G-BO2-IR, H4A-B1, H4A-B2 H4A-B3, H4A-G-B1.
1. Ensure the device is powered on.
2. Using a straightened paper clip (or similar tool), gently press and hold the revert button.
3. Release the button after 3 seconds.
Caution: Do not apply excessive force. Inserting the tool too far will damage the camera.
H3 H3A Bullet Cameras
Applicable models: Avigilon H3-BO1-IR, H3A-BO1-IR, H3-BO2-IR, H3A-BO2-IR.
1. Ensure the device is powered on.
2. Unscrew the Configuration Panel Plug at the bottom of the camera with the supplied opening tool.
3. Using a straightened paper clip (or similar tool), gently press and hold the revert button for 2 seconds.
Caution: Do not apply excessive force. Inserting the tool too far will damage the camera.

H4 PTZ Cameras
Applicable models: Avigilon 1.0C-H4PTZ-DP45, 2.0C-H4PTZ-DP30, 1.0C-H4PTZ-DC45, 2.0C-H4PTZ-DC30.
1. Ensure the device is powered on.
2. Use the Torx key to loosen the screws that fix the cover to the base.
3. Using a straightened paper clip (or similar tool), gently press and hold the revert button for 2 seconds.
4. Re-install the dome cover.
Caution: Do not apply excessive force. Inserting the tool too far will damage the camera.

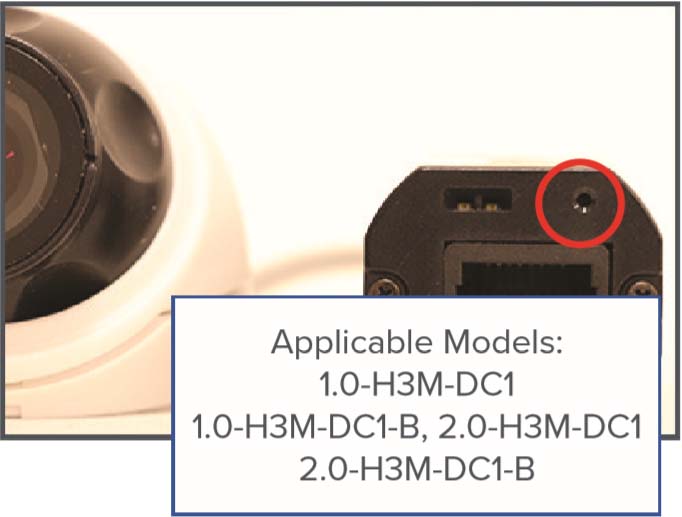
H3 Micro Dome Cameras
Applicable models: Avigilon 1.0-H3M-DC1, 1.0-H3M-DC1-B, 2.0-H3M-DC1, 2.0-H3M-DC1-B.
1. Disconnect power from the device.
2. Using a straightened paper clip (or similar tool), gently press and hold the revert button.
3. While continuing to hold the button, power the device. Release the button after 3 seconds.
Caution: Do not apply excessive force. Inserting the tool too far will damage the camera.
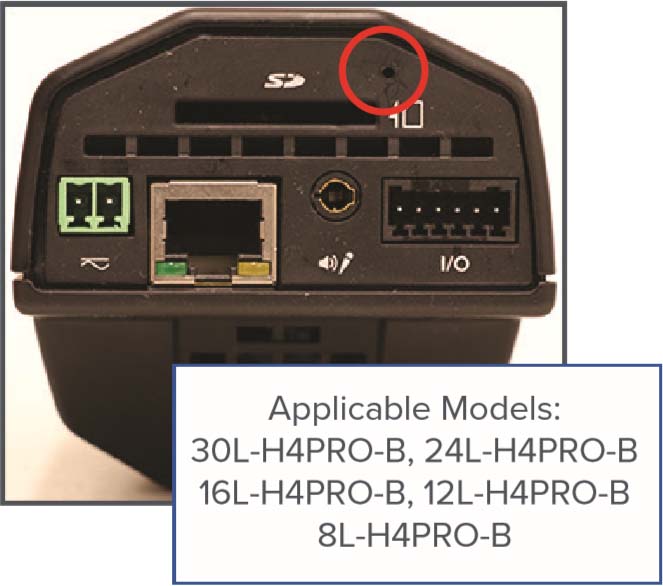
HD Pro B/H4 Pro Cameras
Applicable models: Avigilon 30L-H4PRO-B, 24L-H4PRO-B, 16L-H4PRO-B, 12L-H4PRO-B, 8L-H4PRO-B.
1. Disconnect power from the device.
2. Using a straightened paper clip (or similar tool), gently press and hold the revert button.
3. While continuing to hold the button, power the device. Release the button after 3 seconds.
Caution: Do not apply excessive force. Inserting the tool too far will damage the camera.
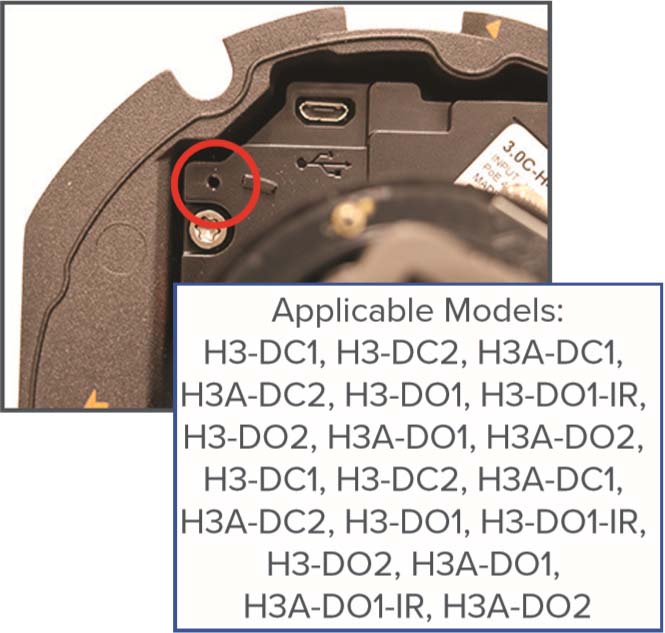
H3 Dome Cameras
Applicable models: Avigilon H3-DC1, H3-DC2, H3A-DC1, H3A-DC2, H3-DO1, H3-DO1-IR, H3-DO2, H3A-DO1, H3A-DO2, H3-DC1, H3-DC2, H3A-DC1, H3A-DC2, H3-DO1, H3-DO1-IR, H3-DO2, H3A-DO1, H3A-DO1-IR, H3A-DO2.
1. Disconnect power from the device.
2. Using a straightened paper clip (or similar tool), gently press and hold the revert button.
3. Release the button after 3 seconds.
Caution: Do not apply excessive force. Inserting the tool too far will damage the camera.
H3 HD Cameras
Applicable models: Avigilon 1.0-H3-B1, 1.0-H3-B2, 1.0-H3-B3 1.3L-H3-B2, 1.3L-H3-B3, 2.0-H3-B1, 2.0-H3-B2, 2.0-H3-B3, 3.0W-H3-B2, 3.0W-H3-B3, 5.0-H3-B2, 5.0-H3-B3.
1. Disconnect power from the device.
2. Using a straightened paper clip (or similar tool), gently press and hold the revert button.
3. While continuing to hold the button, power the device. Release the button after 3 seconds.
Caution: Do not apply excessive force. Inserting the tool too far will damage the camera.
