This CCTV wiring diagram shows a single IP camera set up 2-5 km away from the router. Using a WiFi Bridge you can transmit the CCTV videos up to 5 kilometers away which is very convenient if you plan to install a security camera in a remote location.
CCTV diagram: IP camera, PoE injectors, WiFi bridges, router
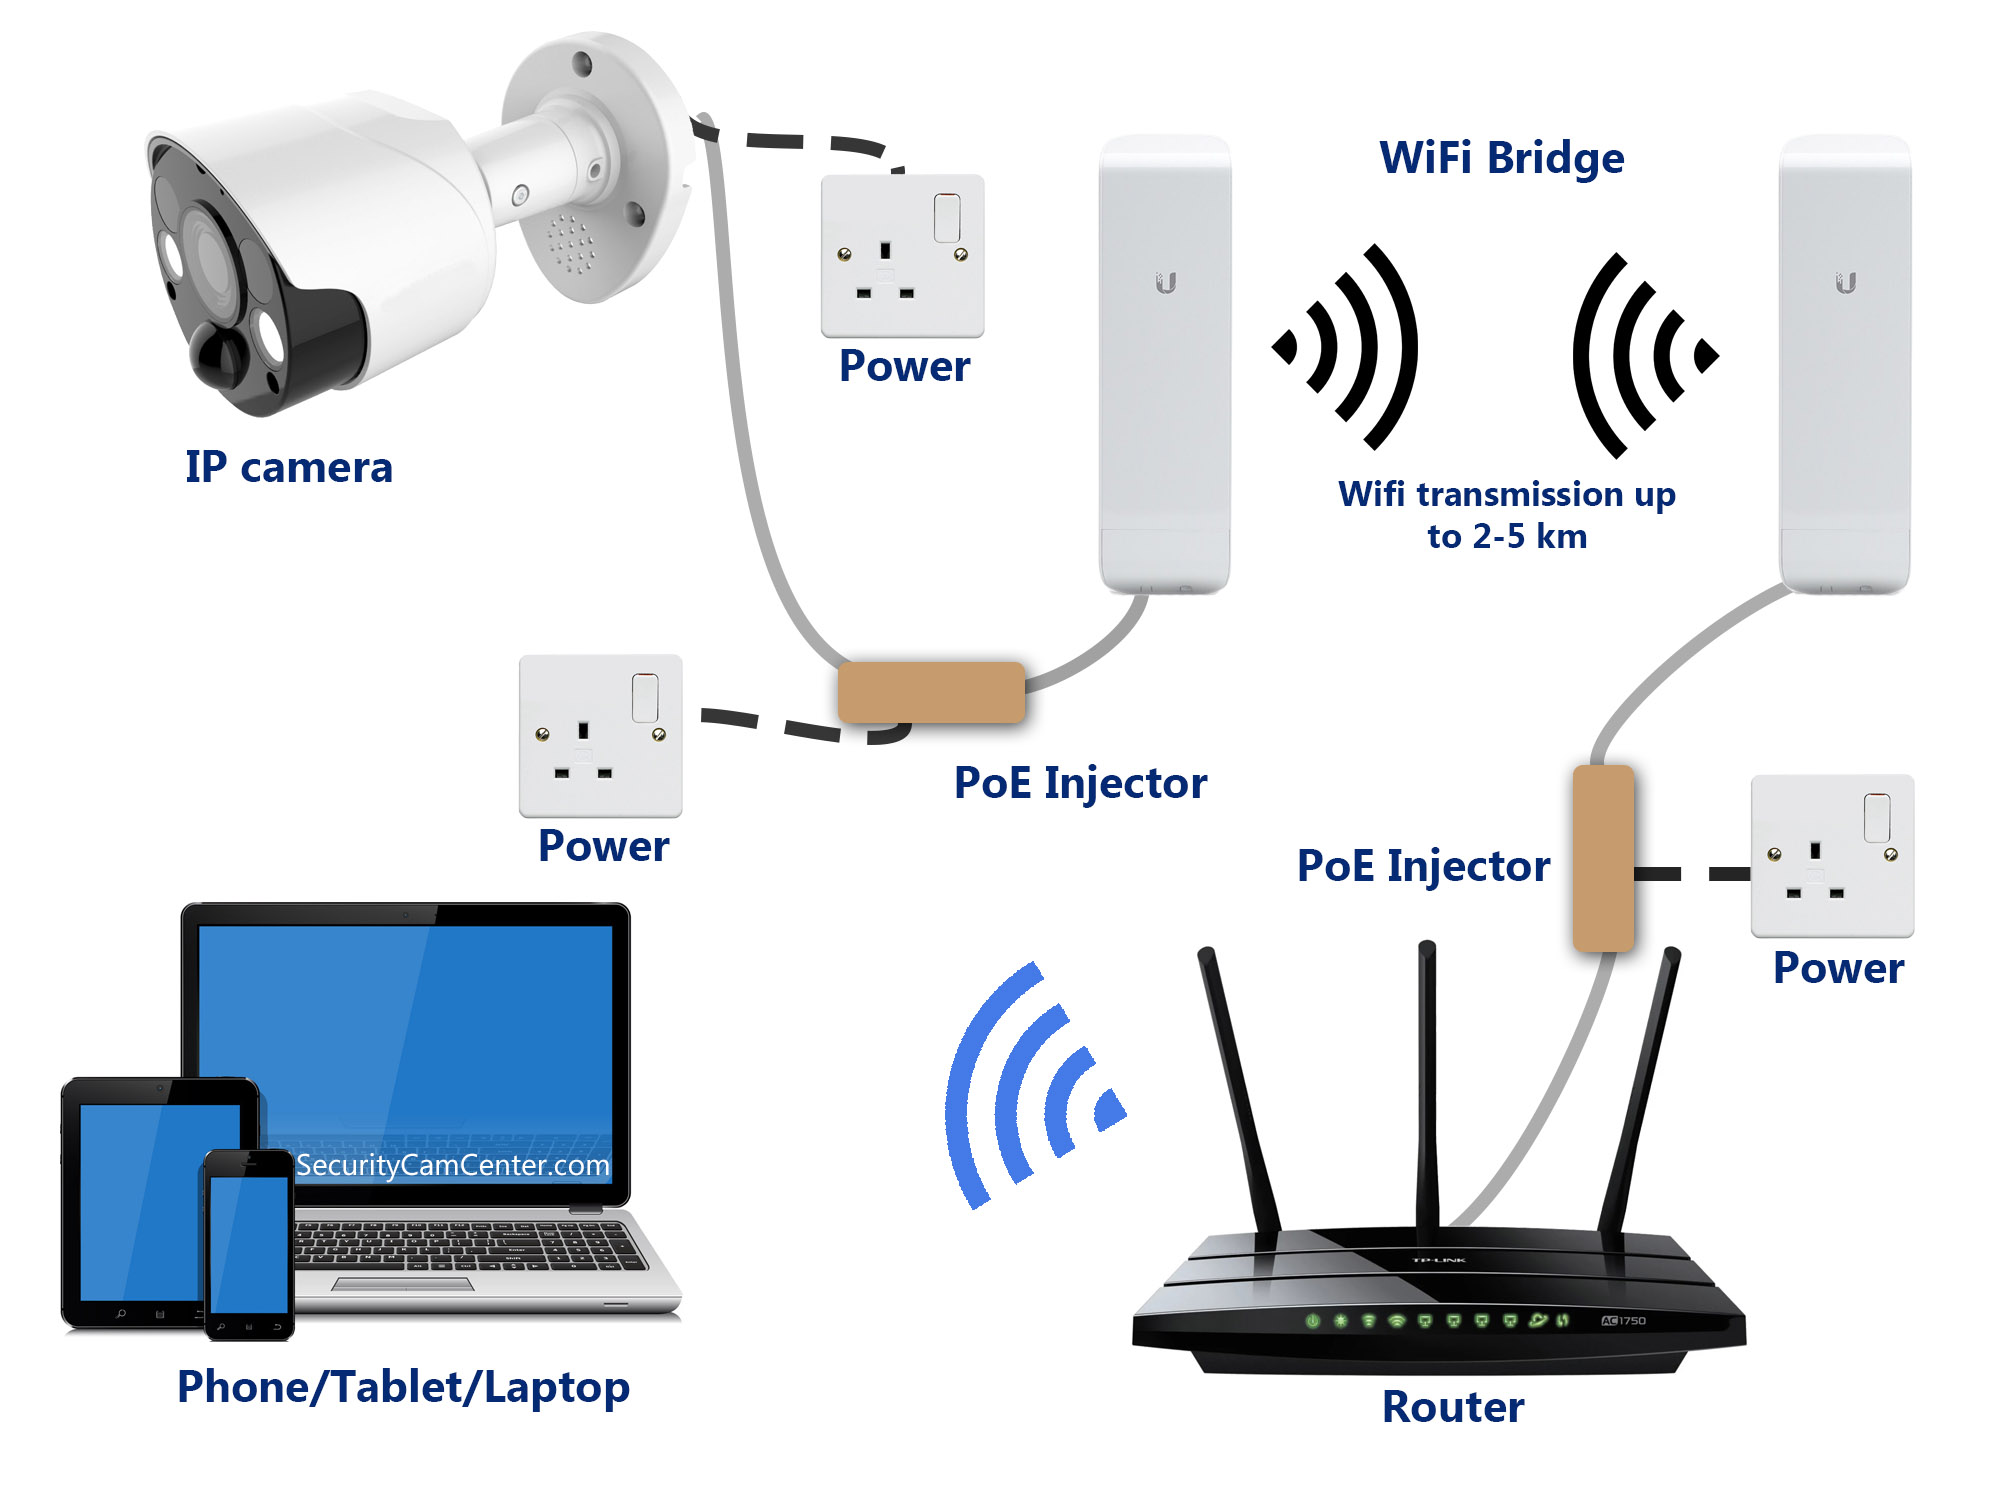
Take a look at the wiring diagram. For this CCTV scheme we need these equipment:
An IP camera
We suggest spending a few bucks more and purchasing a good and reliable IP security camera. Since it will be exposed to the elements, find one that is IP67 weatherproof rated. Another thing to keep in mind, the IP camera must have a built-in microSD card option.
The set up has no NVR or DVR to record, so the camera needs the microSD card to store the footage which you can playback (or download) remotely. Make sure to purchase a CCTV recommended microSD card.
WiFi Bridge
This device lets you bridge the two sides together. One piece goes to the camera’s side and the other one goes to the router’s side. The distance how far the WiFi transmission can go depends on the WiFi Bridge model. It can vary from 1km up to 25km.
There are many WiFi bridge equipment on the market (see here), from our experience the Ubiquiti equipment is easy to install and very reliable for security systems. Moreover, their support is pretty good, if you’re stuck they can remotely help you.
PoE Injector
A PoE injector supplies power to the WiFi bridge piece by “injecting” power into the Ethernet cable. This article details how the PoE injectors work. In this CCTV diagram, we need the PoE injectors to power up the two pieces of the WiFi bridge device. The PoE injector will get the power from the power outlet and then power up the transmission pieces via the Ethernet cable.
Router
In this case, the Wifi Bridge will wirelessly (2-5km) connect the IP camera to your local router. On the router you can connect (wirelessly or not) to your laptop, phone or tablet and access the IP camera.
By accessing the camera you can see the view live, playback, backup the footage or do other settings on the camera.
How to connect the equipment
As you can see on the CCTV wiring diagram shown above, the IP camera connects to the WiFi transmitter via the PoE Injector. Both the camera and the PoE injector power up via the power outlet. On the other side of the network, the second WiFi piece (the receiver) gets power via a second PoE injector and then goes straight to the router.
To set up the bridge, you need to go through the settings of the WiFi transmitter/receiver. Usually with the Ubiquiti devices this is done easily and automatically, the two pieces are linked together via their own software. Additionally, always bring a laptop on the jobsite to let the support team to remote in case you’re having problems with the linkage.
There’s a trick on how you set up the WiFi transmitter or receivers, there should be no obstacles between them and the higher you mount them the better. If obstacles are in the signal’s ways, the picture may be choppy or the effective distance may be reduced. Always inspect the jobsite and consult with the WiFi Bridge manufacturer.
The WiFi receiver power up via another PoE injector and gets connected to the router. Once done, you can access the camera via the web browser using its local IP address. Simply type it on the url bar and enter the username and password of the camera. Then you can see the live view or even playback if you have previously installed a microSD card on the IP camera.
Will the picture be laggy or choppy?
As we mentioned earlier, this depends on a few factors. For example, the WiFi transmitter and receiver should “see” each other without serious obstacles between them. The higher the pieces are installed, the more reliable the transmitted signal.
Another thing, a high resolution camera will need a lot of bandwidth which causes difficulty to transmit the signal properly. You can tweak the settings of the camera to achieve the perfect balance between the resolution, frame rate, bandwidth etc. Play with the settings remotely (or locally) until you’re happy with the results.
The wiring diagram displayed on this article and be modified to your needs, you can add another camera, or power up the transmitter separately, etc. However, if you need to have one single IP camera installed in a remote location, this diagram advises the right way to do it.
