It is possible to add X and Y coordinates on an Axis PTZ IP camera and this guide will show the steps of how this procedure is done.
The same instructions work regardless if you’re using the new interface or the old one. It’s identical and can be completed in just a few minutes.
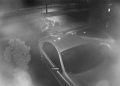
The screenshot below demonstrates an example of a PTZ camera showing the coordinates (X, Y).
 The PTZ coordinates information (the axis X and Y) show along other values such as the frame rate, temperature, bandwidth, sometimes upload speed, etc.
Depending on your needs, you can tweak the settings and display different types of information on the screen. Below is the new type of Axis interface. As you can see, it looks similar and the steps are the same regardless of the model.

How to enable the Axis PTZ coordinates
The PTZ coordinates are displayed via various variables and are available on the old and new Axis firmware versions.
- #x – Notes the Pan coordinates and is displayed on a two-decimal format number.
- #y – Note the Tilt coordinates, shown as on a two-decimal format number.
- #z – This indicates the Zoom coordinates/level and is a number from 1 to 19999.
- #Z – Indicates the Zoom magnification (one-decimal format number).
These parameters can be inserted in the overlay text and the corresponding information will be displayed on the screen. Moreover, you can use a combination of parameters and texts to generate the overlay information that fits the needs of the installation.
Showing the coordinates on cameras with the old interface
Follow these to display the coordinates on Axis cameras that use the old interface (firmware).
Go to the menu and hit Basic > Video Stream and click the Overlay Settings option. Tick the “Include text” box.
This enables the overlay and you can add the variable for coordinates such as #x #y #z #Z (which are explained above).
Additionally, you may choose the text and background colors. Ensure the selected colors are visible on the live feed. Also, you may choose the text size and position where the text will be displayed.
Click Save to apply the new configuration. Below you can see the screenshot of the old camera interface.
 The process is easy. For more information and details, you may check this article: How to add Overlay Text on Axis cameras.
Showing the coordinates on cameras with the new interface
The steps are very similar
- On the main menu, click the Overlay tab.
- Click the “+” sign to create a new overlay.
- Select the Text option and enter the text and variables (such as #x #y #z #Z)
- Select the text and background color, text size, and the position where the text will be displayed on the screen.
- Click Save to apply the settings.
 Basically, that’s all you have to do. Now the overlay information will be displayed on the screen including the coordinates. If you want more options, you can go back to the Overlay section and adjust the configuration.