This article will help you to do the port forwarding (open up the ports) for the Hikvision surveillance systems (NVR or DVR). You need to open the ports if you need to remotely view your cameras via smartphone or any other device.
Port forwarding should only be used when the devices need to be accessed via the internet. To ensure proper security configuration, please follow below points:
- Minimize the port numbers exposed to the internet. Port forwarding should only be configured when absolutely necessary. For example, to use web service, only port 443 (https port) it’s recommended to be forwarded.
- Avoid common ports and reconfigure them to customized ports. For example, port 80 is commonly used for HTTP. Users are recommended to change to a customized port on their devices. Let’s say, instead of port 80, modify to port 8080 or something else.
There are two ways to open up the ports for your Hikvision device. The first and the easy way is by using the UPnP function. In this case the router should support this method, basically the recorder will open up the ports by itself, without any extra configuration on user’s part. The second way is to open up the ports manually on your router.
How to open the ports for Hikvision recorders
Method 1. Configure Port Forwarding via UPnP
Step 1. Enter the local Main Menu of your recorder, go to Configuration > Advanced Configuration > Network > General and correctly configure the network parameters to make sure your device is accessible in LAN. DNS server address is necessary in this case.
You can use Preferred DNS server: 8.8.8.8 and Alternate DNS server: 8.8.4.4. (These steps are the same if you do the settings via web browser)
Step 2. Click Apply to continue.

Step 3. Go to Menu > Configuration > Network > NAT and check “Enable UPnP”.
Step 4. Login your router management interface via web and enable UPnP function. In most of the cases this feature is by default enabled, so you don’t necessarily need to follow this step. However if the ports show up closed, than you need to enable the UPnP function on your router. If you don’t know how, google your router model and UPnP.

Note: The Mapping Type is recommended as Auto. The (External) Port as well as External IP Address will be refreshed if all the configurations are correct. And UPnP Status will be Active. If the UPnP status is still Inactive, then it means the port didn’t open up.
Method 2. Configure Port Forwarding Manually
Step 1. Go to Configuration > Advanced Configuration > Network -> General to correctly configure network parameters to make sure your device is accessible in LAN. DNS server address is necessary in this case as well. Preferred DNS server: 8.8.8.8, Alternate DNS server: 8.8.4.4.

Step 2. Click Apply to continue.
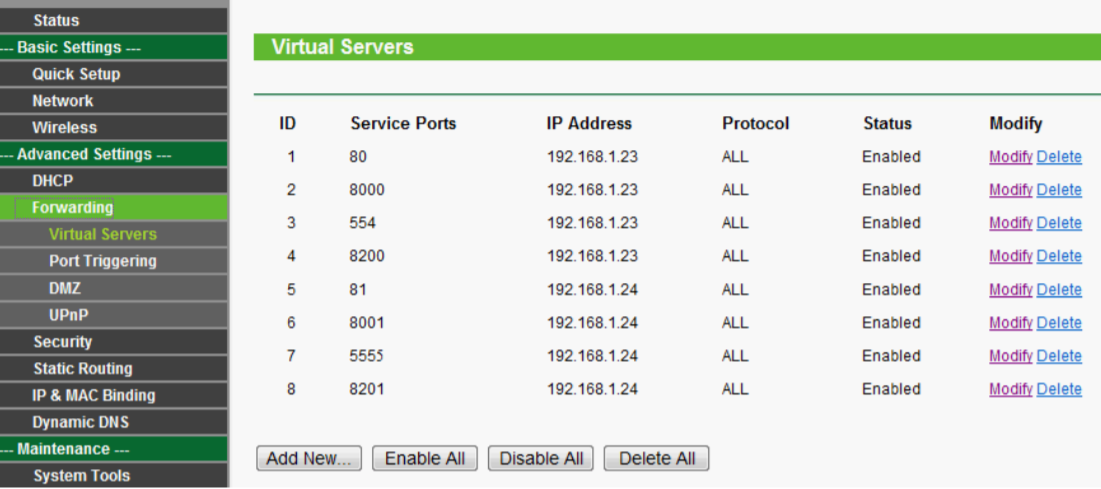
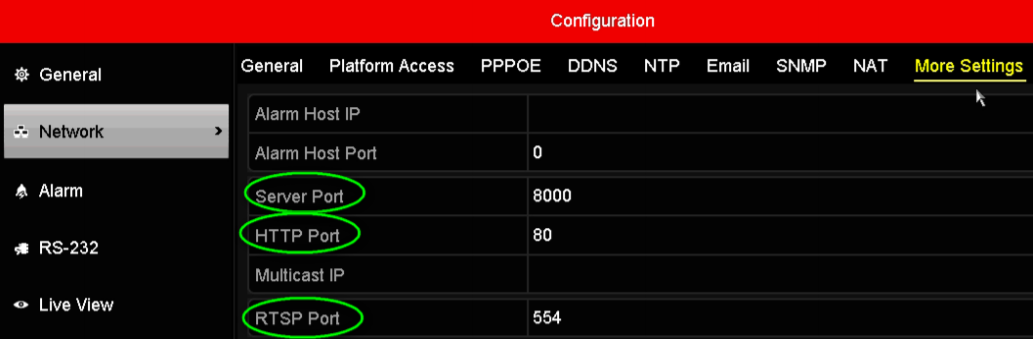
Step 3. Go to Menu > Configuration > Network > More Settings to check the ports you need to open. We recommend to modify these ports and not to use the default ones.
Step 4. Login your router via web browser.
Step 5. Go to Forwarding section of the router and open the ports for the device (all the ports listed above: http, server, RTSP). The IP address should be the local IP address of your Hikvision recorder (NVR, DVR).