• About
  • Contact
  • Privacy Policy
SecurityCamCenter.com
  • Home
  • Buying Guide
  • Learning & Tips
  • Technical Guides
  • Security Tips
  • Downloads
  • CCTV Glossary
No Result
View All Result
SecurityCamCenter.com
No Result
View All Result
Home Technical Uniview

How to setup EZCloud P2P on Uniview NVR

Marco Albertini by Marco Albertini
in Uniview

Uniview is a popular and reliable brand, here we will show how to set up the EZCloud P2P on Uniview NVR or DVR. It’s necessary to do this if you want to view your cameras on via EZView phone app. The steps are logical and easy to follow.

Step 1. Set up your Uniview NVR to utilize the P2P function is to register/create an account. This can be done either directly on your phone via the EZView application or on the EZCloud website (en.ezcloud.uniview.com).

Step 2. Once registered you can now add your NVR(s) to your P2P account. Enable the EZCloud option within your NVR. To enable this go to Menu > System > Network > EZCloud and put a check mark within the Enable EZCloud option. Once enabled you will have two options in adding your NVR to your P2P account. You can either manually input the NVR’s “Register Code” on the app or EZcloud website or you can use the more common method of scanning the “QR Code” using the EZView app.

Once your device is added using either the QR Code or the Register code, you can now review your NVR and its cameras via the EZView application or EZStation PC software (the software made by Uniview).

Sharing your P2P device

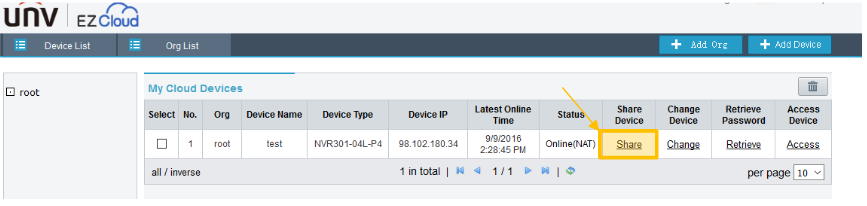
Each Uniview NVR is limited to only be registered one single EZcloud account at one time. Due to this limitation, sharing the device is needed to be accomplished to allow other wanted registered users to access your NVR. To do so login to your EZCloud account via the web and select the “Share” option under the My Cloud Devices section.

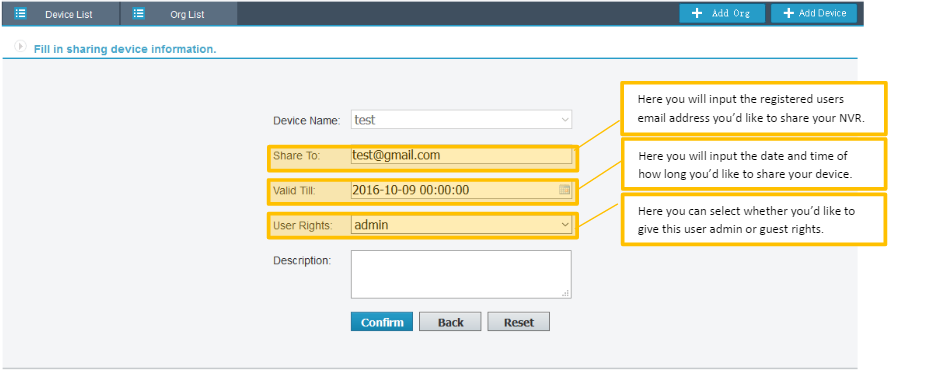
Once you select share it will prompt you to a new page where you will need to fill in the below three pictured fields. Add the users (email address), timeframe to view cameras and their privilege (admin or guest accounts). Once all fields are filled in select Confirm.

Marco Albertini

Marco Albertini

Italian-born Marco Albertini, with a background in Computer Science, found his passion in security camera systems, alarms, and cloud services. Based in New York since 2010, he's a sought-after expert, assisting numerous businesses and homeowners in securing their properties with advanced solutions.

Related Posts

How to Enable Steady (non-flashing) Light on Uniview ColorHunter Cameras

How to Enable Steady (non-flashing) Light on Uniview ColorHunter Cameras

Uniview how-to guides

How to Combine Multiple Uniview NVRs into a Single Unit

Uniview how-to guides

How to Setup Uniview Ultra Motion Detection Feature

Uniview how-to guides

How to Update Uniview Cameras Firmware (2026 Instructions)

Are Uniview Devices Compatible with Hikvision

How to Add a Uniview Camera to a Hikvision recorder

Uniview how-to guides

Uniview: How to Set Up Spot Out

Load More

Leave a Reply Cancel reply

Your email address will not be published. Required fields are marked *

Latest articles

Learning & Tips

Will a Laser Pointer Damage a Security Camera?

How To Fix

How to Prevent IR Reflection in Security Cameras

Smoke Detectors

Smoke Detector Beeps Twice and Stops – How to Fix It (2026)

Hikvision

How to Set Up Hikvision Smart Hybrid Light Cameras

Hikvision

How to Configure Motion Detection via iVMS-4200 Software

SecurityCamCenter is a participant in the Amazon Services LLC Associates Program. This post may contain affiliate link(s). An affiliate link means we may earn advertising or referral fees if you make a purchase through our links, at no extra cost to you.

Categories

© 2024 SecurityCamCenter.com / Security Tips and Tutorials

No Result
View All Result
  • Home
  • Buying Guide
  • Technical

© 2024 SecurityCamCenter.com / Security Tips and Lessons