In this guide, we will provide all the explanations and steps required to manually initialize an IP camera before using it. The instructions are valid for Dahua and their OEM versions sold under various brand names.
Let’s start by explaining what is camera initialization. When configuring a new IP camera for the first time (or after a password/factory reset), an initialization process must be performed before the camera can be used. In other words, you initialize the camera by creating a password (by default the camera comes without any password).
This process was introduced to enhance security by removing the default “admin” password (which used to be 123456), instead of adding a method for the installer to create this password themselves during installation. Before these cameras were easily hacked since the users didn’t bother to change the default password.
The initialization can be performed through the recorder’s (local) user interface. On recorders with built-in PoE ports, this process happens automatically and the current recorder “admin” password is copied to the cameras. So, the password you set for the PoE NVR will be set to the cameras as well.
Older recorders (prior to 2018) will need to have cameras initialized manually using a computer/laptop before they can be used. If you are installing multiple cameras that will be connected to an external PoE switch, the cameras will need to be initialized and the quickest way to do that is by using the Config tool (explained below).
How to Initialise a Dahua IP camera
Initialization using the Config Tool
The initialization process can be performed using the latest version of the Dahua Config tool which is a software that allows you to detect the cameras on the network and modify their settings. To speed up the process the Config Tool also allows you to initialize multiple cameras at once.
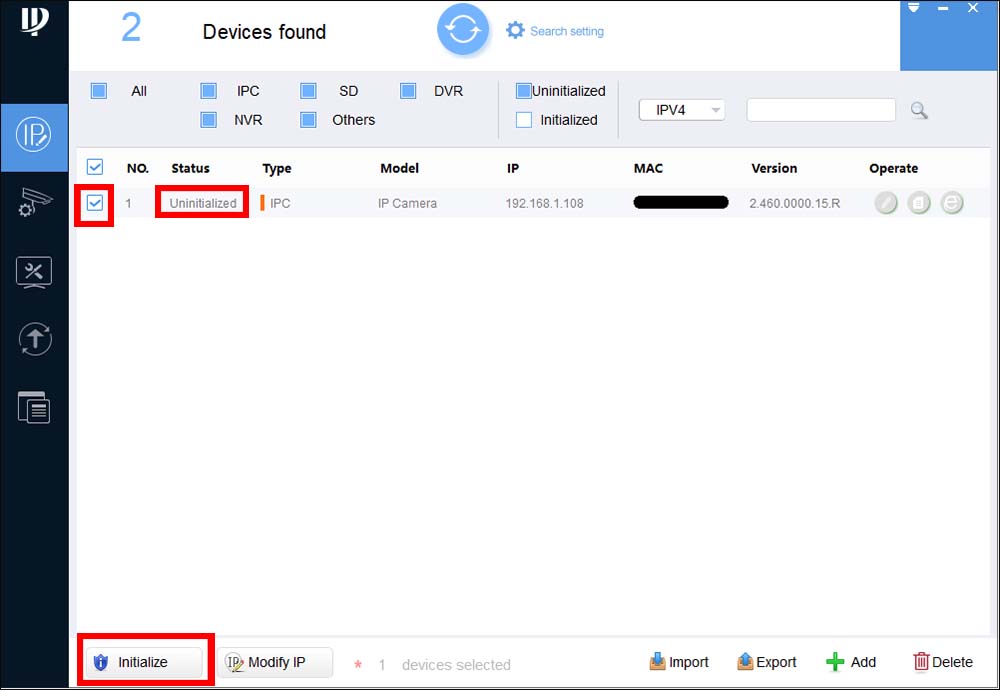
Step 1. Download (click here), install, and then open Config Tool. The tool will automatically scan all the cameras found on your local network. Tick the box next to the device you would like to Initialise and select the Initialize button.
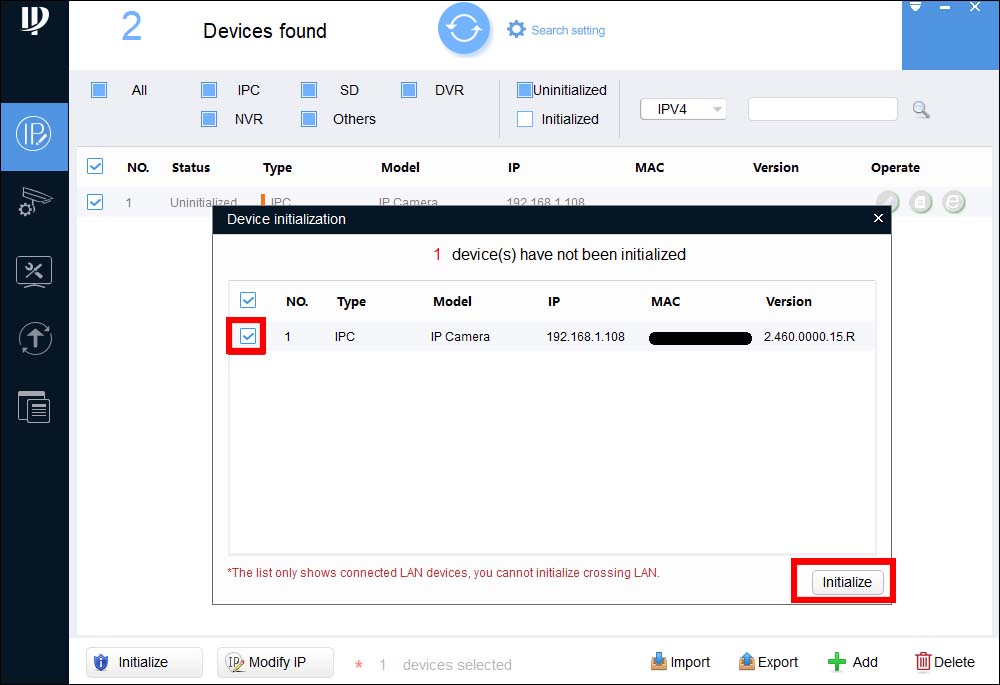
 Step 2. Click on the Initialize button as shown in the picture below.
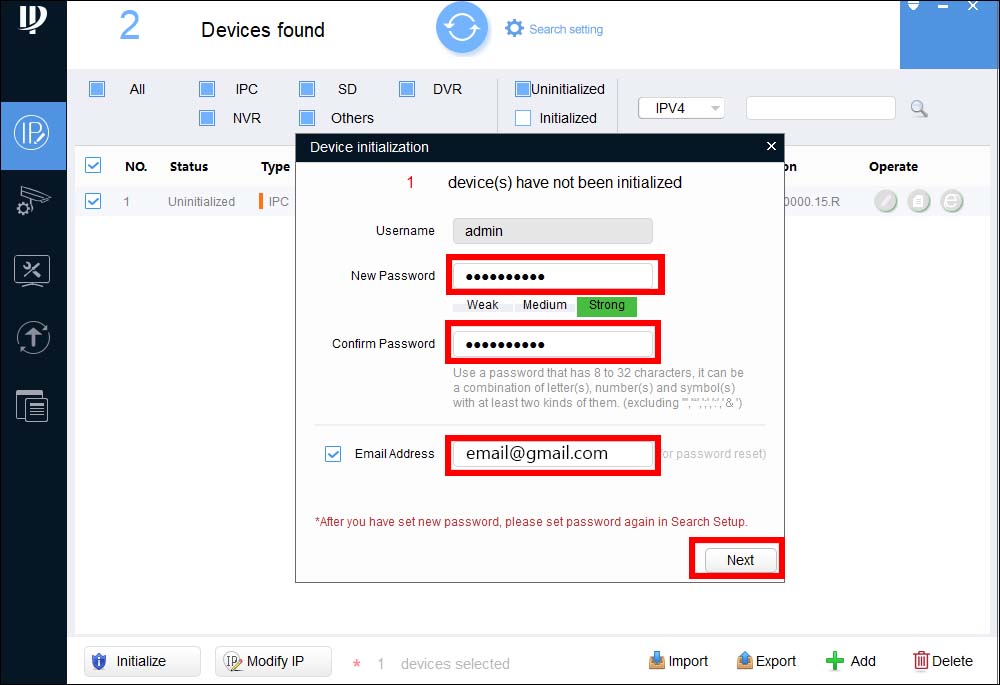
 Step 3. Create a password that is at least 8 characters, and is a mix of letters and numbers. Enter an email address that will be used if the password is ever forgotten. Don’t use an invalid email, you may need to reset the password. Then select Next.
 Step 4. Depending on the installation requirements, you can tick or untick the options for Easy4IP (P2P Remote Access feature) and Auto-check for updates. Once, done select OK.
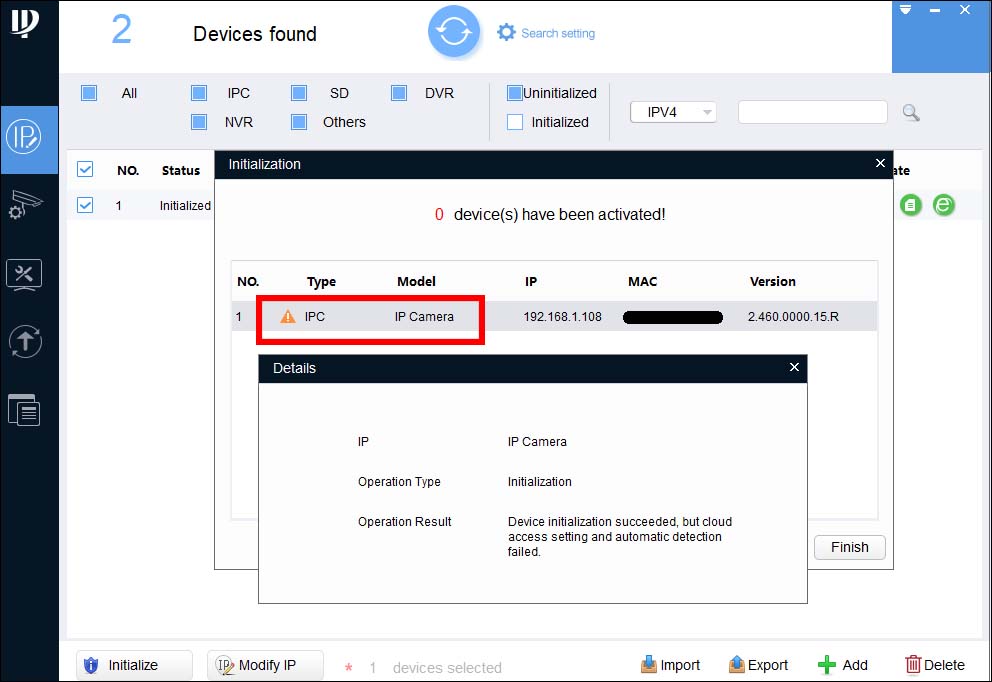
 Step 5. Sometimes an error icon may appear, if you select it, it will describe the type of error. You don’t have to worry about this error, simply skip it.
 Step 6. If the status shows as Initialized, the process was completed successfully which means that your camera has a password and is ready to hook up to the system.
 Using this method (Config Tool) you can initialize multiple cameras at the same time. Simply tick all the cameras that need to be initialized and then follow the steps one by one
Initialization using the Web Interface
This method does not involve the use of the Config Tool software, this method can be used if you have a single IP camera to set up, and do not have access to the internet to download the Config Tool.
Type the IP address of the camera on the URL bar of Internet Explorer, the default IP is 192.168.1.108. Install any plugin that may get asked to.
As seen in the picture, the camera will ask you to create a strong password (since it comes with no pre-set password). Create a password and that will initialize it. After that, you can perform other actions on the camera such as modifying the IP address.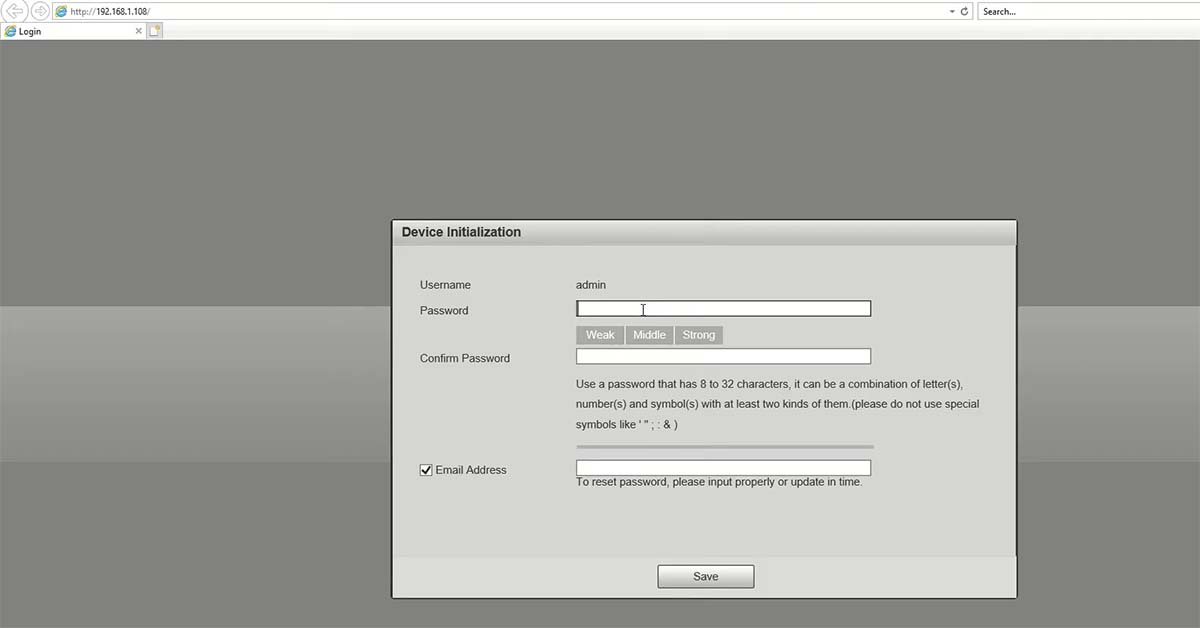 Note: If you have two cameras with the same IP address on the network, they may kick each other out. So, make sure you’re initializing one camera only.
Adding the Camera directly to an NVR
Once initialization is complete, the next step will be to add the camera to your recorder. If you will be connecting the camera directly to the built-in PoE ports of the NVR, simply plug the camera in and it will be detected and added automatically.
If the camera doesn’t show any picture but instead it displays a message saying “Invalid Username or Password”, follow the steps below.
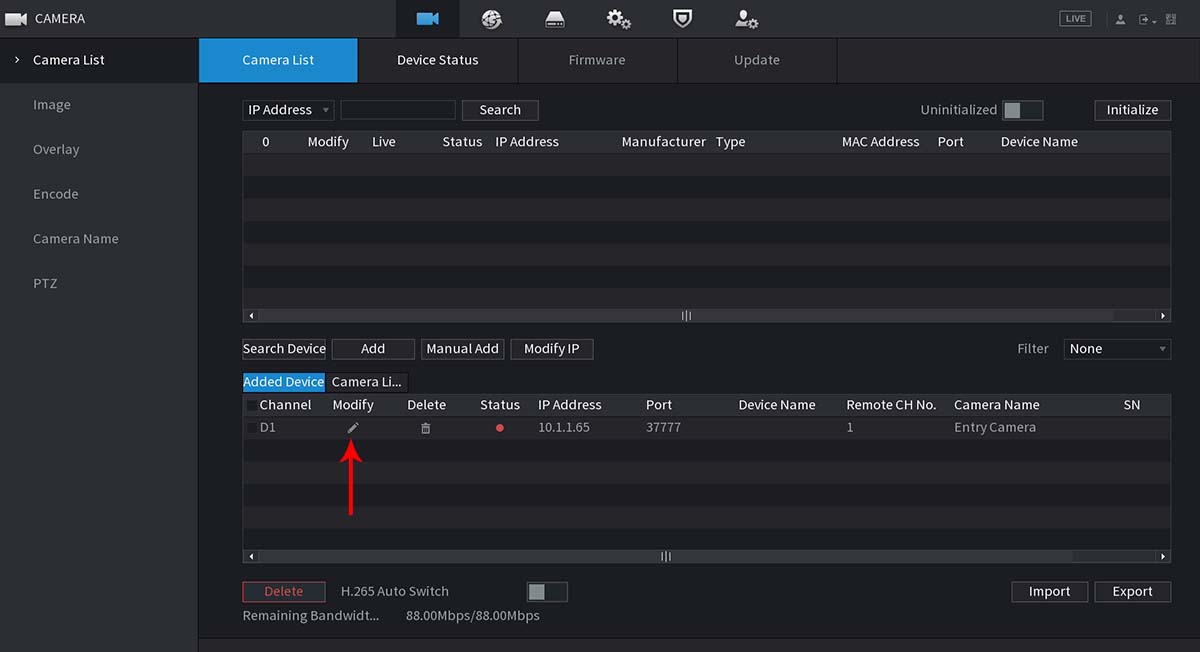
Step 1. Open the Camera Registration section by navigating to the Main Menu > Camera > Camera List.
Step 2. Click on the Modify/Edit pencil of the camera with the error. Its Status will most likely be marked in a red dot (as shown below)
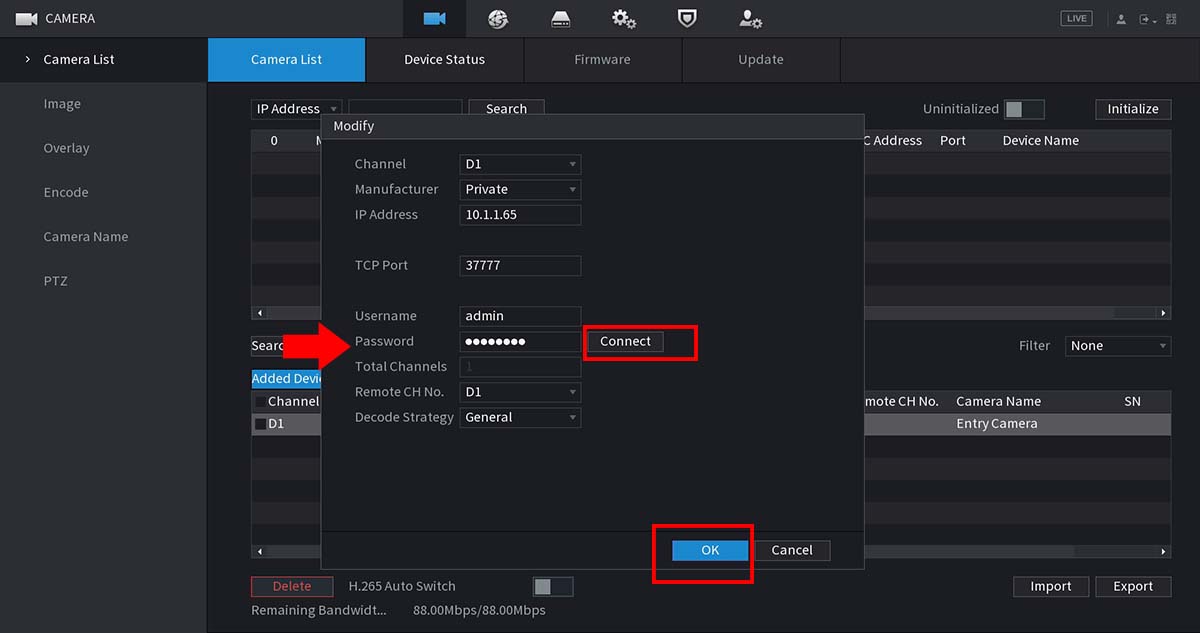
Step 3. On the “Modify” window, enter the password of the camera (this would have been set during the initialization process in Config Tool) and click Connect, then OK.
 If you still see the Account Locked error when viewing the camera live, you may need to reboot the camera by unplugging it briefly and then plugging it back in.
In other words, if the picture doesn’t show, all you have to do is to enter the newly created password for the camera. Once you do that, the NVR will be able to access the camera and display the camera’s feed on the screen.
Note: If you are connecting the camera to a recorder via an external network switch, the IP address of the camera must be set manually to an address within the network range of the recorder.
So, if the recorder’s IP address is 192.168.1.100 then the camera’s IP address should be in the same range (for example 192.168.1.110). Then all you have to do is access the NVR, navigate to the Device/Registration section, and add the camera manually (type the IP address, enter the username and the password). Click Save and after 1-2 minutes, if the settings are correct, you’ll be able to see the live picture of the camera.


