In this article, we will show how to set up Hikvision DVR for DropBox recording. You can upload from your Hikvision DVR or IP camera not just footage, but photo snapshots as well.
You can have your Hikvision DVR recording the videos locally and in the cloud at the same time. This ensures you can have a backup just in case something bad happens to your DVR (such as being stolen or damaged).
If you want to record on the cloud using Google Drive or Microsoft OneDrive, consult the articles below:
• How to set up Hikvision cloud recording on Google Drive
• How to set up Hikvision cloud recording on Microsoft One Drive
Hikvision cloud recording on Dropbox
Step 1. Type the IP address of your recorder in the URL bar of your web browser (use Internet Explorer). Log in using your username and password.
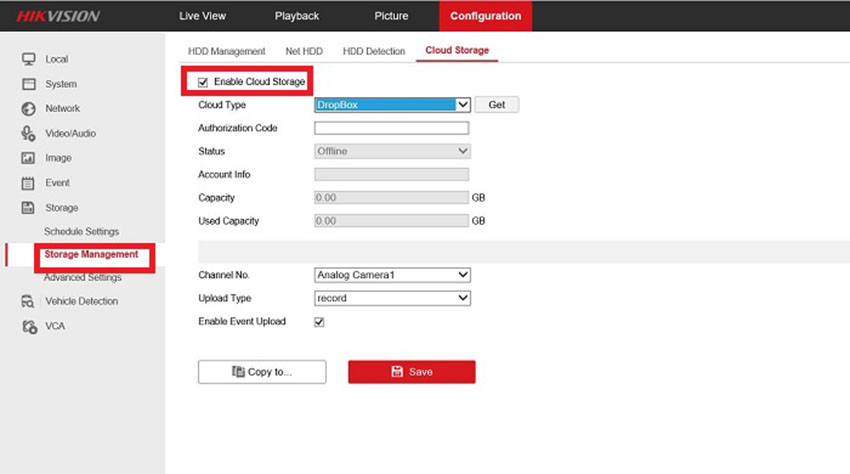
Step 2. Navigate under Storage > Storage Management and then the Cloud Storage option. Enable the Cloud Storage option and from the Cloud Type, and on the dropdown list choose DropBox.
Click the “Get” button to obtain a DropBox authorization code for enabling your DVR to access your DropBox account and save records.
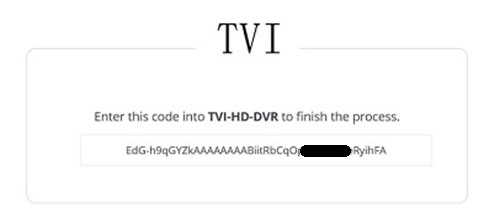
 Step 3. By clicking the “Get” button, a new page will be opened where you’ll be asked to allow the DVR to access the files and folders stored in your Dropbox account. Choose to allow.
 Step 4. Copy the generated access code and paste it in the Authorization Code box in order to finish the authorization step.
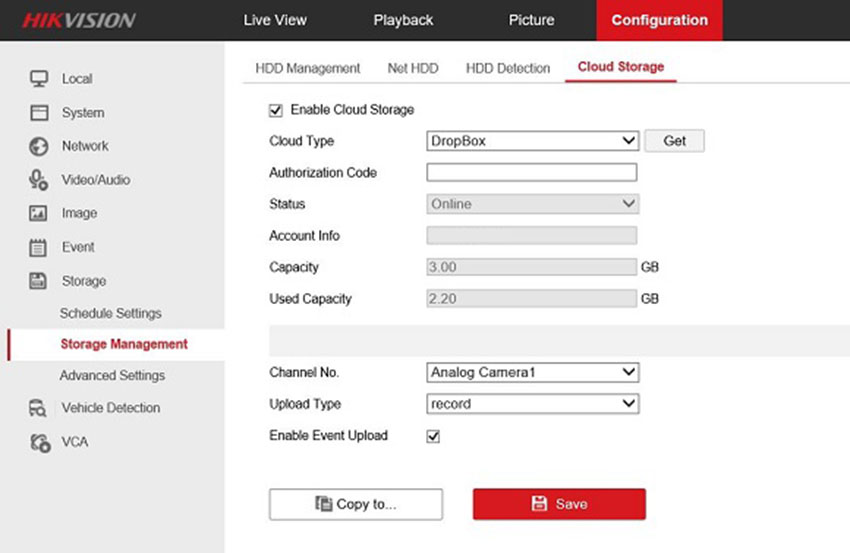
 Click the Save button. Once the settings are saved the Cloud Storage option status will switch from Offline to Online. Account information such as name, total capacity and used capacity will also be displayed.
 Step 5. From the Storage option (right side) choose Schedule Settings in order to set the record schedule.
Choose the camera(s) you intend to use for cloud recording, enable the schedule, and set the schedule according to your needs. In our example, an all day event recording is used for cloud recording.
 Then, under the Event option go to Basic Event and then Alarm Input. Enable the Alarm Input Handling, then Upload Pictures to Cloud option.
From the Trigger Channel list, choose channel 1. Click save to activate the settings.
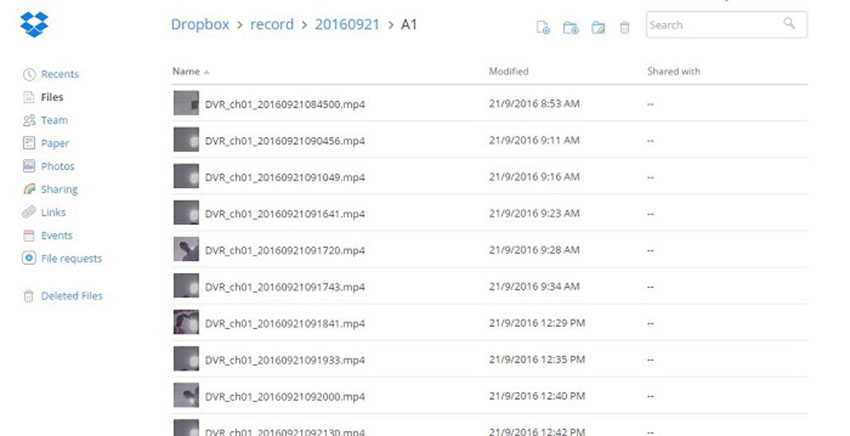
 Moving to DropBox account the Hikvision DVR automatically creates a Record folder. Once an event occurs, such as motion detection on channel 1, under Record Folder, a new folder with the date name will be created and under this folder, a new folder will be created. In our case, A1 represents the folder where all the recordings will be stored.
The recordings video format is mp4 and these clips can be viewed by performing a click over the file name. Besides the embedded video player, users can also download or share video files with other people.
A single thing needs to be mentioned, the resolution of video files is the same set for substream (you can tweak the settings under Video&Audio tab).
When you set up Hikvision cloud recording using the Dropbox service, you will expand the storage capabilities of your system and record for more days.
Additionally, the cloud serves as extra protection against physical damage to your system. If something happens with your system, you still can download and view the footage via the cloud.
