• About
  • Contact
  • Privacy Policy
SecurityCamCenter.com
  • Home
  • Buying Guide
  • Learning & Tips
  • Technical Guides
  • Security Tips
  • Downloads
  • CCTV Glossary
No Result
View All Result
SecurityCamCenter.com
No Result
View All Result
Home Technical Zosi

Zosi IPC Channel Config explained

Marco Albertini by Marco Albertini
in Zosi

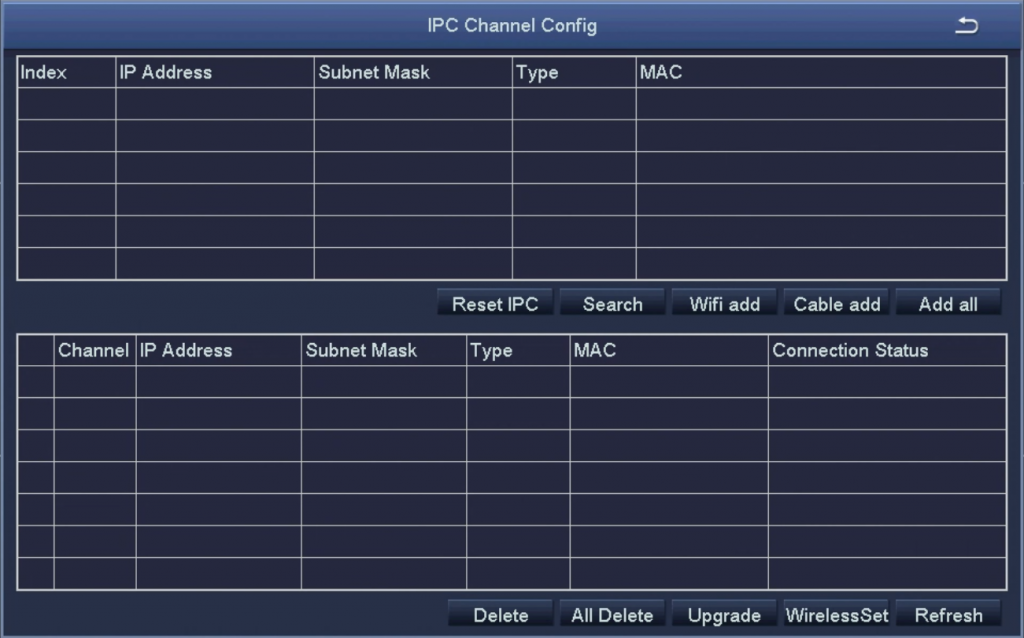
This guide explains the Zosi IPC Channel Config section which is used to Add and Remove individual IP cameras from your NVR. When you need to add a IP camera to a Zosi NVR, you need to add it via the Channel Config tab.

Basically, in this tab you can scan your network which will list all the IP cameras connected to the network. Click on it and Add the camera to the NVR.

Additionally you can reset the IP camera to factory settings, add them all via the local network of the WiFi (if it’s supported by the recorder), delete certain cameras, upgrade their firmware, etc. Below we’ve explained each term.
Zosi IPC Channel Config explained

Reset IPC – Resets the credentials of the selected camera. Bring the camera’s username and password to factory default. It’s useful if the camera is acting up and you can start fresh by resetting it (which quite often solves many software related issues).

Search – Search your local area network (LAN) for an IP camera. This will also find cameras that are physically attached to the NVR via Ethernet cable. Lists the WiFi cameras as well.

Wifi Add – Use this to add your IP cameras to the device after powering them on. Obviously, works on WiFi IP cameras only.

Cable Add – Use this to a wired camera to the NVR (connected via a Ethernet Cable).

Add All – Adds all found IP cameras to the NVR

Delete – Deletes the selected camera from the NVR.

All Delete – Deletes all cameras from the NVR.

Upgrade – Upgrade the firmware of the selected camera. This is done automatically. Works on supported versions only.

Wireless Set – Apply the Wireless Settings to the selected camera.

Refresh – Refreshes the list. If you can’t find the camera, always hit “Refresh” and wait until it shows up.

Marco Albertini

Marco Albertini

Italian-born Marco Albertini, with a background in Computer Science, found his passion in security camera systems, alarms, and cloud services. Based in New York since 2010, he's a sought-after expert, assisting numerous businesses and homeowners in securing their properties with advanced solutions.

Related Posts

Zosi How-to Guides

Zosi Smart app fails at 85% and then shows a “device connection failed” message

Zosi How-to Guides

MicroSD Card Not Detected on Zosi Camera (quick fix)

Zosi How-to Guides

How to find Zosi Device ID or UID

Zosi How-to Guides

Zosi view cameras offline (quick fix)

Zosi How-to Guides

Add Zosi IP camera to the NVR by matching code

Zosi How-to Guides

Zosi “IPC disconnected” or “Server not found” issue (solution)

Load More

Leave a Reply Cancel reply

Your email address will not be published. Required fields are marked *

Latest articles

How To Fix

How to Prevent IR Reflection in Security Cameras

Smoke Detectors

Smoke Detector Beeps Twice and Stops – How to Fix It (2025)

Hikvision

How to Set Up Hikvision Smart Hybrid Light Cameras

Hikvision

How to Configure Motion Detection via iVMS-4200 Software

Thermostats

How To Fix Nest Thermostat Error E195

SecurityCamCenter is a participant in the Amazon Services LLC Associates Program. This post may contain affiliate link(s). An affiliate link means we may earn advertising or referral fees if you make a purchase through our links, at no extra cost to you.

Categories

© 2024 SecurityCamCenter.com / Security Tips and Tutorials

No Result
View All Result
  • Home
  • Buying Guide
  • Technical

© 2024 SecurityCamCenter.com / Security Tips and Lessons