This guide explains the Zosi IPC Channel Config section which is used to Add and Remove individual IP cameras from your NVR. When you need to add a IP camera to a Zosi NVR, you need to add it via the Channel Config tab.
Basically, in this tab you can scan your network which will list all the IP cameras connected to the network. Click on it and Add the camera to the NVR.
Additionally you can reset the IP camera to factory settings, add them all via the local network of the WiFi (if it’s supported by the recorder), delete certain cameras, upgrade their firmware, etc. Below we’ve explained each term.
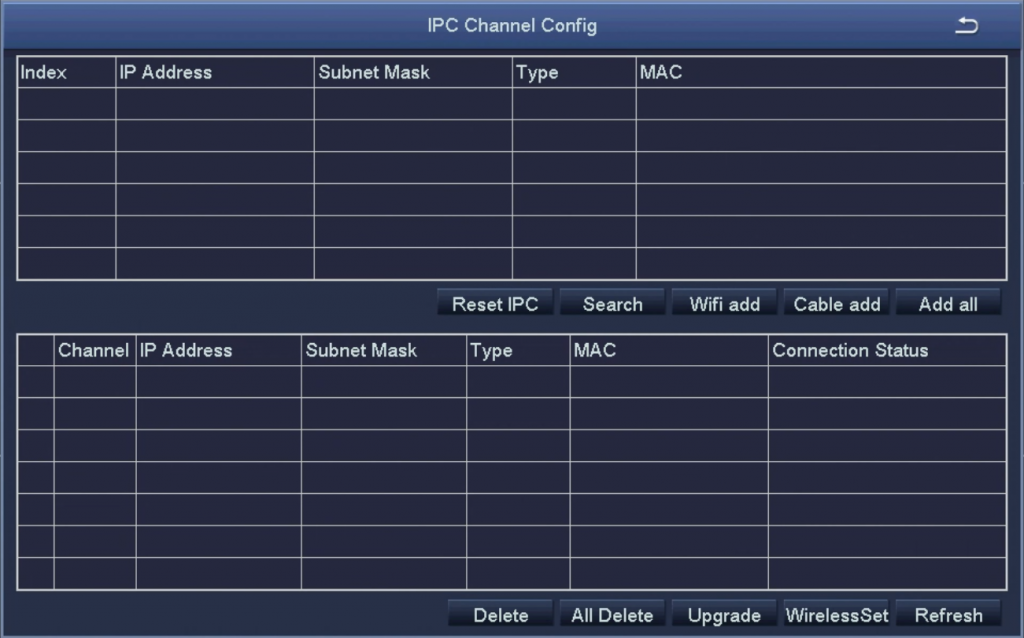
Reset IPC – Resets the credentials of the selected camera. Bring the camera’s username and password to factory default. It’s useful if the camera is acting up and you can start fresh by resetting it (which quite often solves many software related issues).
Search – Search your local area network (LAN) for an IP camera. This will also find cameras that are physically attached to the NVR via Ethernet cable. Lists the WiFi cameras as well.
Wifi Add – Use this to add your IP cameras to the device after powering them on. Obviously, works on WiFi IP cameras only.
Cable Add – Use this to a wired camera to the NVR (connected via a Ethernet Cable).
Add All – Adds all found IP cameras to the NVR
Delete – Deletes the selected camera from the NVR.
All Delete – Deletes all cameras from the NVR.
Upgrade – Upgrade the firmware of the selected camera. This is done automatically. Works on supported versions only.
Wireless Set – Apply the Wireless Settings to the selected camera.
Refresh – Refreshes the list. If you can’t find the camera, always hit “Refresh” and wait until it shows up.