Face Detection allows your device to detect face events, store them in a database or even send out a snapshot to the owner. These features can be used standalone through the IP camera or in conjunction with a Smart NVR (sometimes called AI NVR).
Depending on the camera model and firmware version, the device will detect the faces that come under the camera, create a snapshot and thumbnail and list various information such as gender, age, wearing glass or not, face mask, bear, etc.
Face Detection setup for Amcrest cameras
There are two steps to this procedure; first, you need to enable the Face Detection feature since it’s by default disabled. Then you need to adjust the setting of how the images are captured, and adjust various variables; basically, you need to customize it to fit your needs and conditions.
Enable face detection
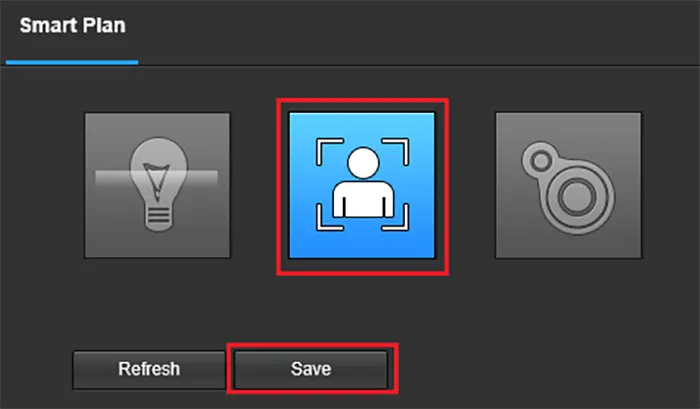
Login into the camera via the web browser and enter your credentials. Then navigate to Setup > Event and then go to the Smart Plan section.
Here you need to check (tick) the Face Detection box on the right side. Hit Save to apply the settings.
Next, again on the Event tab (left side of the panel), and click Face Detection. Then on the right side, check the box beside “Enable”.

Adjust the options
This section contains a few options and adjustments that need to be tweaked accordingly. First, check the Record options to allow the camera to record the face detection events.
To increase the efficiency of the image, click on the Enable Face Exposure checkbox. This helps to automatically increase or decrease the exposure of the image once a face is detected.
If you check the OSD option, then you’ll see a square on subjects’ faces on the live video feed. The Face Enhancement option will increase the image quality of the detected face by using certain algorithms.

If you want to exclude a specific area on the interface from being able to detect faces, then you can use the Exclude Region option. Click on it and draw the excluded area on the interface (no face faces will be detected there). Click Save to apply the settings.
All face detection events can be viewed in the Playback menu if a microSD card has been installed. If using a microSD card in your camera it must be properly formatted to FAT32 to function properly.
Face Detection an Amcrest NVR
Another method is by using an NVR. Both the camera and the NVR should support Face Detection and you can set them up to have the face pictures stored and analyzed directly in the recorder.
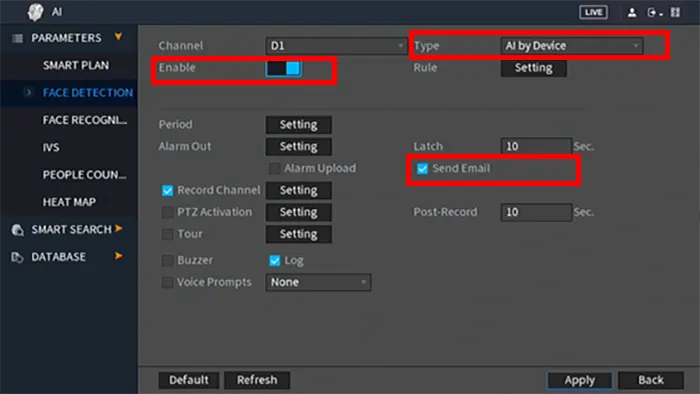
Same as the camera’s example, you need to enable Face Detection under Parameter > Smart Plan. Then you go to the Face Detection section (again under Parameters) and select which channel to configure from the Channel drop-down menu.
Next, choose which face detection type you will be using from the Type drop-down menu. In this example, we will be using AI by Device (which means that the NVR will handle the face detection events and will analyze them accordingly). Click Apply to Save the settings.
You can leave the Rule settings as default, however, they can be adjusted by clicking on the Setting button. Then you can use your mouse to adjust the minimum and maximum size of the face detection area.
Another option you can check is Send Email. When triggered, the face detection event will be captured as Snapshot and then forwarded to your email address as an alert.
How to view face detection events via the NVR
You can access all face detection data using the Face Detection option on the Smart Search menu. Enter the start and end date and the system will list all the available data.

All the stored face detection data will be displayed along with other information such as age, gender, face expression, glasses, etc. That’s basically all. As we said, there are a lot of options to play around with until you get the right adjustment that works for your specific case.