In this article we will show how to setup the Wyze cam and how to do the settings. It’s a step by step guide and very easy to follow. To get started, you will need: Wyze Cam, smartphone or tablet (Apple or Android), your WiFi network name and password. The setup should take about 5 minutes.
Step 1. Download the Wyze app and connect to a WiFi network. Get the Wyze App from the Google Play Store or the Apple App Store. Once downloaded, open the Wyze app and login or create an account.

To create a new account:
• Tap “Sign up” on the app screen
• Enter your email address, then enter your password twice. You can tap the icon in the password field to view the password and make sure you entered the same password in each field.
• Tap “Continue”
• Follow the rest of the instructions in the app
• Connect your phone to your 2.4GHz WiFi network and have your network password ready.
Step 2. Plug in the camera using the included USB cable and power adapter. When setting up your camera, make sure to use the included USB cable and power adapter. This will ensure the right amount of power is going to the camera and prevent performance issues.
 The LED light will be a solid yellow to tell you the camera has power. Once the light starts flashing, your camera is ready for setup.
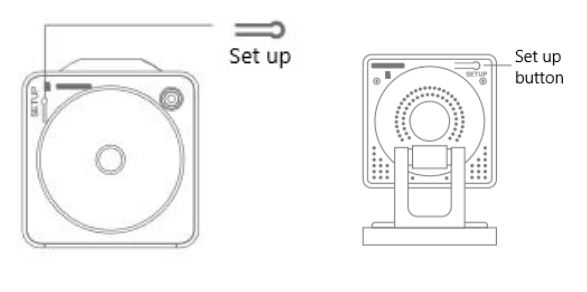
Step 3. Adding a new device in the Wyze app. In the Wyze app, press the “New Device” button in the center of the screen. Select Wyze Cam. If you already have a device set up in your account, you can add another by tapping […] in the top right of the Home tab, followed by “Add a Product”.
Press and hold the SETUP button on the bottom of the camera until you hear a beep and “Ready to Connect”. Tap the Next button in the app.
 Step 4. Adding your WiFi Information. Enter your WiFi network name and password. Tap the icon in the password field to display the password to ensure it was entered correctly. Tap next. Note: Wyze cameras only work on 2.4GHz WiFi networks. They do not work on 5GHz networks. Most WiFi Routers that are 5GHz also have a 2.4GHz band as well. Make sure you are not connected to “WiFi name 5GHz”. SSIDs are limited to a 31 character length maximum.
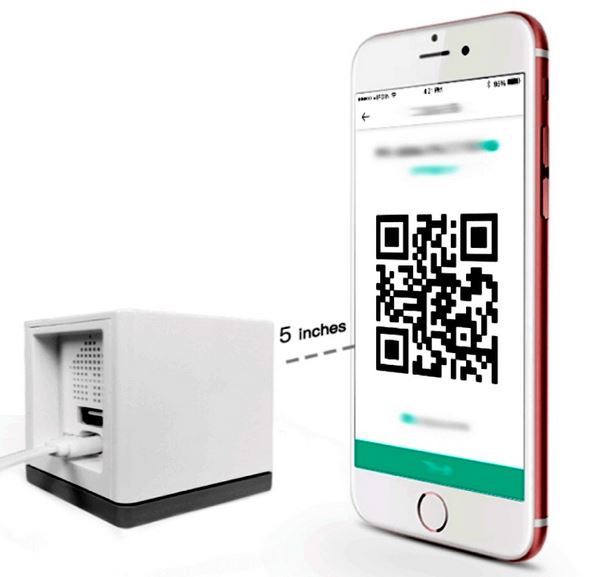
Step 5. Scan the QR Code. The app screen displays a QR code. Face the lens of your camera toward the QR code on your phone. The camera will scan the QR code and you will hear “QR code scanned, please wait”.
If you’re having trouble scanning the QR code:
• Hold the phone steady about 5 inches in front of your camera. It may take a few seconds for the camera to scan the code.
• If it doesn’t scan, change the distance between your phone and the camera slightly and hold both steady. Keep adjusting the distance until the camera scans the code, but hold at each new distance for a couple of seconds to let the camera adjust.
• If it still doesn’t scan, tilt the screen slightly in case there are light reflections not allowing the camera to see the QR code correctly. LED lights, in particular, can cause reflections that stop the QR code from being scanned easily.
• Cracks or scratches on the screen can distort the QR code. Try again using a phone or tablet that doesn’t have a cracked screen.
Step 6. Finishing Setup, Once you hear “QR code scanned, please wait” tap the button in the Wyze app. The button you need to tap should read “I hear -QR code scanned. Please wait”.
Wyze Cam will then complete the setup. The LED light indicator on the back will flash yellow and blue, then flash blue, and when setup is complete, it turns to a solid blue and says “Setup is completed”. Now you can name your camera and you are good to go.
Moving your Wyze Cam
At any point, you can move your Wyze Cam. Unplug the device and move. Once it is plugged in, it should power up and automatically connect to the same WiFi.
If you have changed the WiFi, you will have to setup the device and start the setup process again to generate a new QR code and with the new WiFi settings. Note that you do not need to delete the cameras from the Wyze app. Doing the Setup process again will override the previous WiFi setup. Other camera settings will be retained.
On the Home tab of the Wyze app, tap the […] in the upper right, then select “Add a Product” to initiate a new setup. Follow the prompts on the screen to set up your camera again.